


Feedback
Document unitization
You must have valid Relativity Community credentials in order to download any Community file linked to the documentation site. You'll need to enter those credentials on the Community login screen if you're not already logged in. If you're already logged in to the Community at the time you click a link, the file is automatically downloaded in the bottom left corner of your screen. If you get an error message stating "URL No Longer Exists" after clicking a Community link, it may be due to a single sign-on error related to the SAML Assertion Validator, and you should contact your IT department.
The Document unitization solution can be used to split an imaged document into multiple child documents. This solution is one component of the Document Utilities application along with the move to folder path mass operation.
Before you begin
Using the Document unitization solution, you can split a document into multiple child documents. You can specify the page range of each child document and split the parent document into as many child documents as necessary.
Supported versions
This solution is supported in Relativity 9.2.337.3 and above.
| Solution version | Supported Relativity version |
|---|---|
| 24000.0.3 | Server 2024 |
Components
This solution consists of the following components:
- Relativity application
- Relativity dynamic objects with associated object rules
- Event handlers
- Manager and worker agents
- View on the Document object
- Layout on the Document object
Permissions
Users must have the following permissions in order to use this solution:
- Add and edit document permissions.
- Add image permissions on the document object.
- View and edit permissions on the Document unitization layout.
- View permissions on the Unitization Job object for users who need to see the status of unitization jobs or requests.
- If you are overwriting security on document folders, the appropriate groups must have Add Document and Add Images permissions per folder.
The Document unitization solution doesn't work when document item-level security is enabled. Set the Document’s associated folder permissions accordingly.
Considerations
Before you deploy and run the solution, it's important to keep the following in mind:
- Unitization only works on imaged documents, not natives.
- Unitization does not carry redactions from the parent document to the newly created child documents.
- You can unitize any document with images.
- You can have more than one of each type of agent (manager and worker).
- When you unitize a document, Relativity tags that document as a Parent and tags each child document as a Child. You can't unitize a Child document.
- You can't unitize documents while the parent document is in the process of being unitized into child documents. You can view the Related Items pane to confirm that all child documents were successfully created before submitting a new request.
- No metadata is propagated to child documents.
- The application must be installed in at least one non-administrative workspace in order for the agents to stay active in the environment.
- The Document unitization layout is visible in the mass edit drop-down menu, but you shouldn't use the mass edit drop-down menu to split documents because the event handler framework doesn’t execute from the mass operation framework.
- Document Utilities is a Relativity application which currently contains two solutions: Move to Folder (a mass operation) and Document unitization. By installing the Document Utilities application, you automatically install the Move to Folder mass operation. If you don't want the Move to Folder mass operation in your workspace, you must manually remove the solution. For more information on the Move to Folder mass operation, see Move to Folder Path.
Deploying and configuring the solution
To deploy and configure the solution, you must first add it to the Application Library as a Relativity application. You can then install and configure the solution in a workspace.
To deploy the solution, you first add it to the Application Library as a Relativity application. You can then install it from the Application Library to one or more workspaces.
This script runs from the Admin level, you must install this application into a workspace for it to appear in the Script Library (at the instance level).
To add the solution to the Application Library:
- Log in to Relativity.
- Navigate to the Application Library tab.
- Click Upload Application.
- Click Select File.
- Navigate to and select the application file included in the solution, and then click Open.
- Click Save to upload the file to the Application Library.
To add the solution to a workspace:
- In the Workspaces Installed section, click Select to install the application to one or more workspaces.
- Select the workspace(s) where you want to install the application, and then click the Move select to the right icon.
- Click Apply.
The application is installed to the selected workspace(s). A list of workspace(s) where the application has been installed displays in the Workspaces Installed section.
Preparing the workspace
After you add the solution application to the Application Library, you're ready to install and configure it in a workspace by performing these basic tasks:
- Create manager and worker agents.
- Configure padding settings for child documents.
Creating manager and worker agents
To perform document unitization, you must first create at least one manager agent and one worker agent. You can create multiple instances of these agents if you want to distribute the workload.
To create manager and worker agents, perform the following steps:
- Navigate to the Agents tab.
- Click New Agent.
- Click Select next to Agent Type, choose Document Utilities - Unitization - Manager, and click Set.
- Enter the number of manager agents you want in the Number of Agents field.
- Click Select next to Agent Server, choose the agent server where you want to install the new agent, and click Set.
- Enter the appropriate interval.
- Leave all other settings at their default values, and then click Save and New.
- Click Select next to Agent Type, choose Document Utilities - Unitization - Worker and click Set.
- Enter the number of worker agents you want in the Number of Agents field.
- Click Select next to Agent Server, choose the agent server where you want to install the new agent, and click Set.
- Enter the appropriate interval.
- Leave all other settings at their default values, and then click Save.
When you create manager and worker agents, you must create them on each instance of the agent server that shares the same resource pools as the workspaces you plan on using the Document unitization solution in. The solution will not process any data in a workspace if the associated resource pool does not have its own manager and worker agents. Any Document unitization jobs will simply sit inactive in queue.
Configuring padding settings for child documents
When you unitize a document, a new document identifier is assigned to the child document(s).
You can configure the padding, or the number of zeroes that appear before the final number. To configure the padding, perform the following steps:
- Click the Document Utilities tab, then click Unitization Configuration.
- Click Edit next to Default Padding.
- Change the value in the Padding field, and then click Save.
When you install the Document Utilities application in a workspace, the Default Padding value is automatically set to 5.
If you change this value from the default of 5, only new job requests use the new padding. Previous unitization jobs are not be updated.
The maximum Default Padding value is 20 characters.
Running the solution
To unitize a document, perform the following steps:
- From the Document list, select a document. Documents must have at least one image to be unitized.
- From the Layouts drop-down menu, select Document Unitization. This layout can specify a page range for any units you want to split the document into. It also provides Document Unitization History details if the document has been unitized previously.
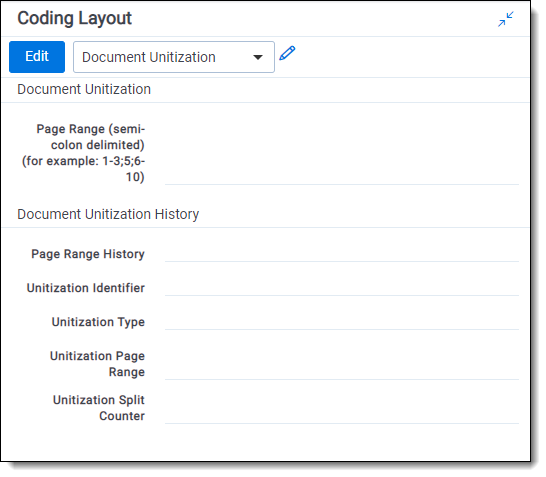
- In the Page Range field, enter the pages you want included in the new split document(s). You can enter a single page or any range of pages using semicolons to separate the values. For example, entering 1-3; 5; 6-10 would produce three new child documents: one with pages 1-3, one with page 5 alone, and one with pages 6-10 of the original document.
- Click Save.
The page range you entered moves from the Page Range field to the Page Range History field in the Document Unitization History section. To view the newly split document(s), return to the Document unitization view on the Document list.
Viewing the results
After you've specified the page range(s) for the new document(s) using the Document unitization layout and clicked Save, you can view the newly created child document(s) in the Related Items pane.
Click the Unitization icon to view all the child documents for the parent document you just split. The most recently created child document appears at the bottom of the list. Click the control number to view the document.
When you're viewing a parent document, the Unitization Page Range field on the Document unitization layout is blank, and when you're viewing a child document, the Unitization Split Counter and Page Range History fields are blank.
You can also see the newly created child document(s) on the Document list.
From the Views drop-down menu, select Document Unitization to display document unitization details.
The newly created child document(s) appear on this Document unitization view. You can locate the child document(s) on this view using the Unitization Identifier and Unitization Page Range.
The Document unitization view provides the following details for each document:

- Artifact ID - the artifact ID of the document. Each parent document and every child document has its own unique artifact ID.
- Unitization Identifier - the parent document identifier. Any child documents are given the same unitization identifier as the parent document.
- Unitization Type - specifies whether the document is a parent or a child.
- Unitization Page Range - for child documents, provides the range of pages from the parent document that are included in that child document.
- Unitization Split Counter - for parent documents, displays the number of child documents the parent document has been split into. You should not alter this value unless specifically directed to do so.
- Page Range History - for parent documents, displays each range of pages that the document has been split into. Each unitization request is enclosed by square brackets.
Handling errors
While using the Document unitization solution, you may encounter the following issues or error messages:
When Document unitization agents are added to Relativity, they are added to specific resource pools, which are associated with workspaces. If you attempt to unitize documents in a workspace and nothing happens, it may be because there isn’t at least one dedicated manager or worker agent added to that specific resource pool.
Error messages
At least one requested document currently exists. Please update the Unitization Split Counter field to match the number of unitized documents.
This message appears when the value in the Unitization Split Counter field is less than the number of children already created. To resolve, update the value in the Unitization Split Counter field to equal the number of children that have been created.
This document cannot be unitized because this is a child document of a previously unitized parent document. Please try unitizing the parent document [Parent Control Number: ].
This message appears when you try to unitize a document which has a Unitization Type = Child. To resolve, locate the parent document and unitize that document.
Unitization Padding is not set up.
This message appears when the Default Padding setting does not have a value. To resolve, perform the steps in Configuring padding settings for child documents.
Missing images for pages: 10-200
This message appears when you attempt to unitize pages (images) that do not exist for the current document.
Child document identifier value will be greater than document identifier field length. Please try again by lowering your padding value or by increasing document identifier field length.
This message appears when you attempt to unitize a document and the length of the resulting child document identifier exceeds the value set for the document identifier field. You can resolve this issue by decreasing the padding value (using the steps in Configuring padding settings for child documents) or by increasing the length of the document identifier field in your workspace.
Uninstalling Document Utilities
Consider the following when uninstalling the Document Utilities application:
- When you uninstall the Document Utilities application, the Move to Folder mass operation is also uninstalled unless you explicitly clear the associated checkbox.
- If you uninstall the Document Utilities application and leave all application components selected, the unitized child documents will remain; however, you'll lose all the application history, and all future jobs will fail because the documents have already been unitized. To prevent this:
- Ensure you deselect all Document fields after you click Validate components to uninstall.
- Ensure you deselect all Unitization Job and Unitization Configuration fields after you click Validate components to uninstall.
- The Unitization Job RDO contains a log of actions and statuses when requests were made. If you want to preserve this log, make sure to deselect the Unitization Job components before uninstalling.
Performance expectations
Document Unitization completes approximately 500 unitization jobs an hour.
The number of images included in a unitization job and the number of times that images are split may decrease performance.