


 See an animated GIF of the installation steps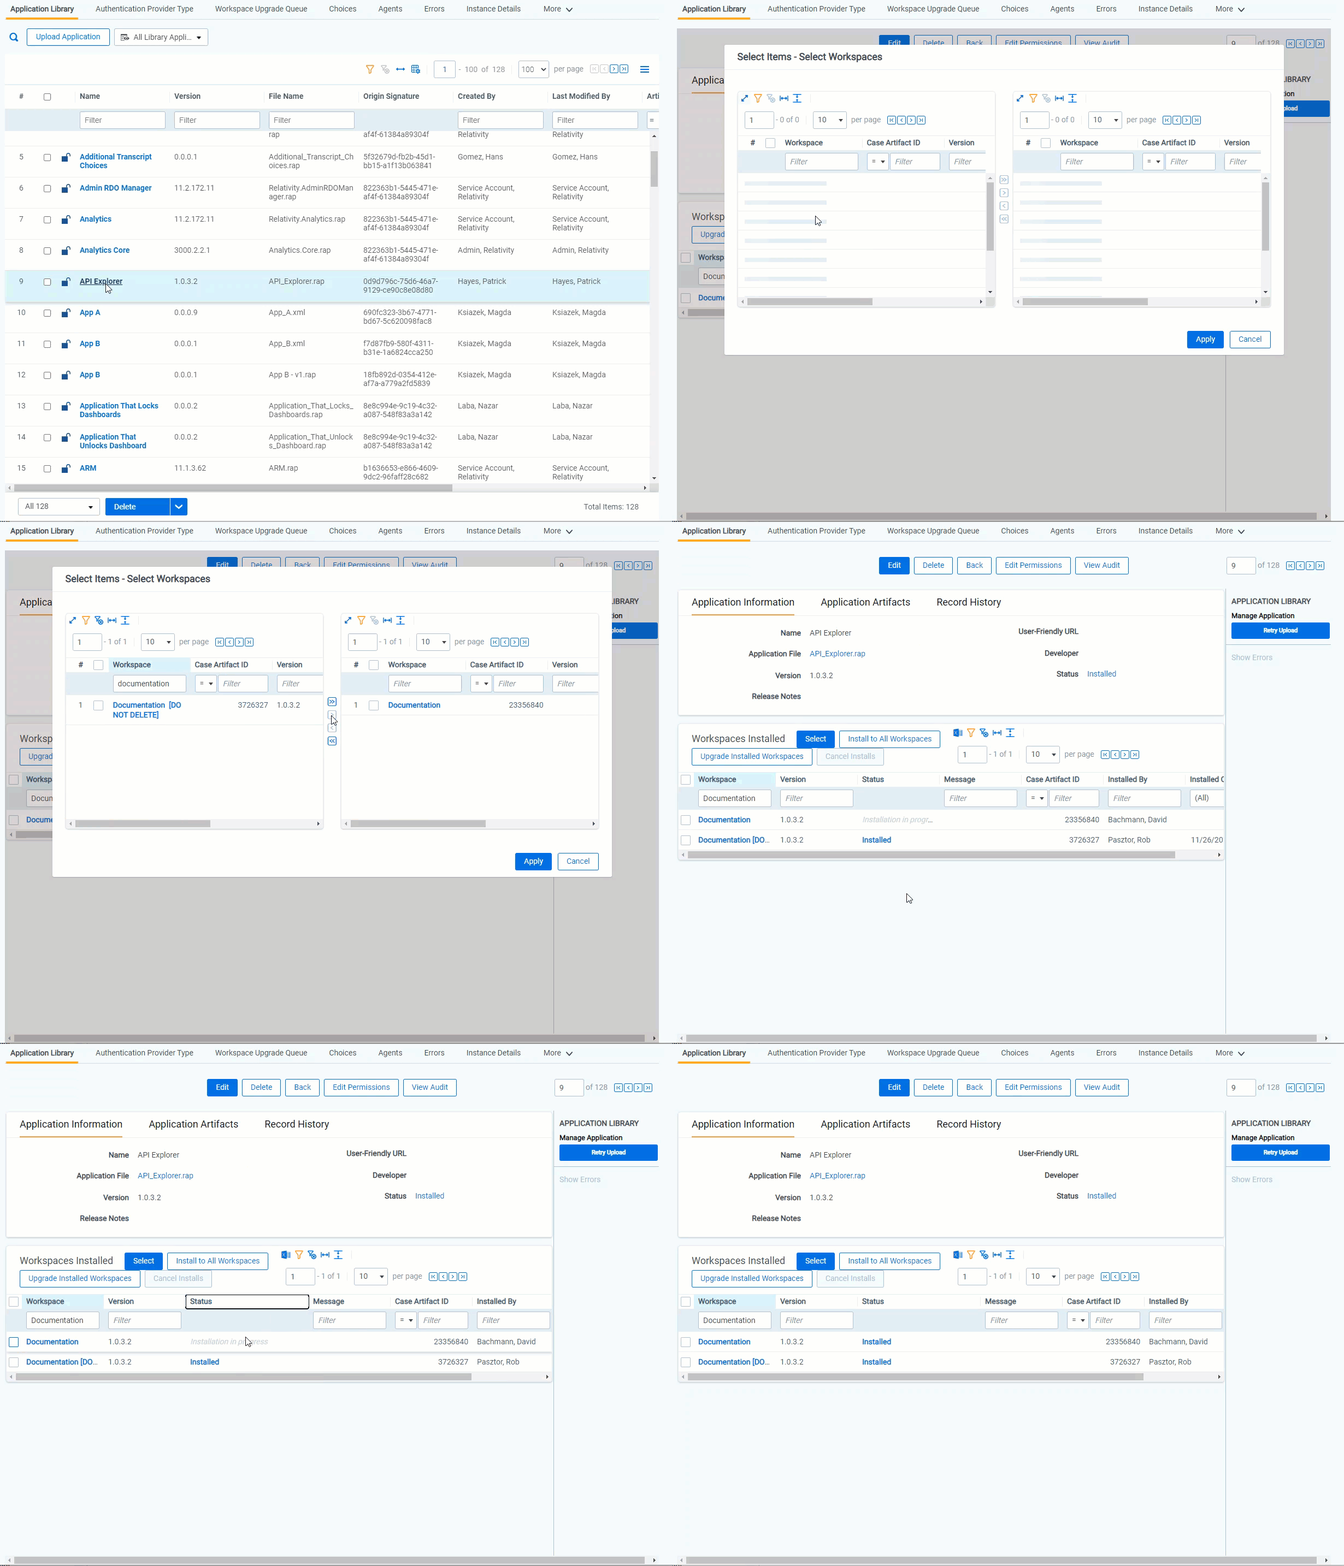

Feedback

Relativity provides you with several different options for installing applications. You can:
Starting with Relativity Server 2026, Relativity verifies the compatibility of Relativity Application Package (.rap) files at upload time. When you upload a RAP, Relativity reads the build and validation results that the Server RAP Builder recorded inside the package and displays a compatibility notice that describes the application's compliance status before you complete the installation.
Server RAP Builder is the supported tool for building applications that target Relativity Server. Applications that are not built and validated with Server RAP Builder using the SDK packages from the Relativity Server Artifactory feed fall outside Relativity's supported build path, and Relativity Support and Engineering may not provide troubleshooting assistance for issues related to them.
Relativity displays the compatibility notice as a pop-up in the following scenarios:
The notice is not displayed when you create a new application from scratch, or when you install an existing application from the Application Library to a workspace using the Select from Application Library option. Verification occurs when the RAP file is first uploaded.
The pop-up blocks the import until you acknowledge it. Click OK to dismiss the notice, and then click Save (Application Library) or Import (Relativity Applications tab) to proceed with the installation. The notice is advisory and never prevents you from installing the application. However, installing a non-compliant application means the new application is outside of Relativity's support policy.
The message displayed is determined by whether the application was built with the Server RAP Builder, whether the build produced validation warnings, and which Relativity Server version the build targeted:
| Scenario | Notice text |
|---|---|
|
Compliant Built with the Server RAP Builder, no validation warnings, targets the current or last supported Server version. |
This application was built with Server RAP Builder and successfully passed all Server SDK and assembly validation checks. It is considered compliant and remains within Relativity's support policy. Click “OK” to proceed with installation. |
|
Warnings present Built with Server RAP Builder, validation warnings found, targets the current or last supported Server version. |
This application was built with Server RAP Builder but contains compatibility issues identified during validation. It may not fully meet Server SDK and assembly requirements and falls outside of Relativity's support policy. Review the build results below for more details, or click “OK” and then “Save” to proceed with installation. |
|
Older target version Built with Server RAP Builder, no validation warnings, targets a Server version that is not current or last supported. |
This application was built with Server RAP Builder and passed validation checks, but it targets an older version of Relativity Server that is not supported for this environment. It falls outside of Relativity's support policy. Review the build results below, or click “OK” and then “Save” to proceed with installation. |
|
Warnings and older target version Built with Server RAP Builder, validation warnings found, targets a Server version that is not current or last supported. |
This application was built with Server RAP Builder but contains compatibility issues and targets an older version of Relativity Server. It does not meet Server SDK and assembly requirements and falls outside of Relativity's support policy. Review the build results below for more details, or click “OK” and then “Save” to proceed with installation. |
|
Not built with Server RAP Builder The RAP contains no build results from Server RAP Builder. |
This application was not built with Server RAP Builder and did not undergo compatibility validation. It may not be compatible with this version of Relativity Server and falls outside of Relativity's support policy. Proceed with caution, or click “OK” and then “Save” to proceed with installation. |
|
Front end-built application The RAP contains no custom resource files, indicating it was built entirely within the Relativity front end. |
This application was built exclusively from the Relativity front end and contains no custom Resource Files. It is not subject to Server SDK or Server RAP Builder policy requirements. It is considered compliant and remains within Relativity's support policy. Click “OK” to proceed with installation. |
When warnings are present, the pop-up displays the detailed validation results from the build so you can review the specific issues, along with a link to more information on the Relativity Server SDK compliance policy. To bring an application into compliance, the application developer must resolve the reported issues and rebuild the package with Server RAP Builder targeting the current Server release.
When a RAP is uploaded, Relativity saves the build information to the Application object. The following fields appear on the Application Information tab of the application layout, and as columns in the Application Library list view:
The full set of validation check results from the build is available on the Server RAP Builder Validation Results tab of the Application object. If the application was not built using the Server RAP Builder, this tab displays the following message in place of results: This application was not built using Server RAP Builder, so no build results are available.
[Placeholder screenshot: Application Library list view with the compliance columns]
You can add applications across multiple workspaces by installing them to the Application Library. You can do this by installing applications as external files or pushing them from a single workspace.
You need to upload the external file for the application to the Library Application tab. After you add it to the Application Library, you can install the application to workspaces directly from this tab. You can also use the Relativity Application tab to add it to the current workspace. Confirm you have appropriate system admin permissions for application installation. For more information, see Workspace security.
Use the following procedure to install an application to the Application Library:
Click Save to upload the file to the Application Library.
The application appears on the list page
In the column on the left, select the workspaces you want to install the application to.
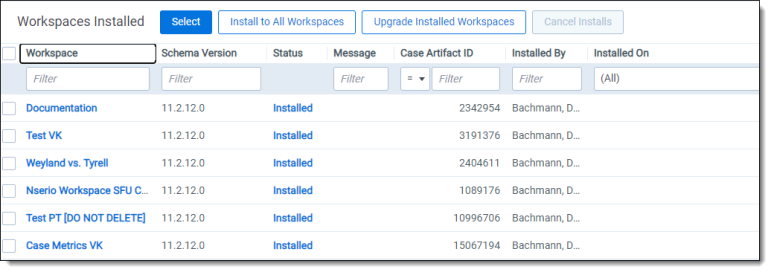
| Application Installation Status | Description |
|---|---|
| Pending... | Relativity flags the workspace for installation, but is not installing. To cancel the installation, select the check box next to the workspace name, and then click Cancel. |
| Errors | The install failed due to one or more errors. Click Errors to try to resolve conflicts within Relativity. See Troubleshooting application installation errors. |
| Application out of date. May not work properly. | The version of the application that's installed to this workspace is lower than what's installed to the Application Library. Select the workspace's checkbox, and then click Install to upgrade the application in the workspace. |
| Installation in progress | The application is currently installing to the workspace; you can no longer cancel the installation. |
| Installed | The application installed successfully. Click the Installed link to view the import status details. |
When you want to add any application in a workspace to the Application Library, you can use Push To Library available on the detail view of an application. You can then install the application to workspaces throughout your Relativity environment. In Relativity, confirm that you have the appropriate system admin permissions to install an application. For more information, see Workspace security.
You override any existing applications with the same GUID when you push an application from a workspace to the library.
To install an application from the Application Library to one or more workspaces, perform the following steps:
Once installation is complete, navigate to any of the workspaces you selected, select the Relativity Applications tab, and verify that the application was installed.
You can install applications to workspaces from the Application Library tab or by importing an external application file.
When you install an application, all components are public regardless of the permissions that you assign to them in your application. The ADS framework ignores any permissions or security assigned to a component added to an application during deployment in a workspace.
If you added the application to the Application Library, you can install it to the current workspace without importing an external file to Relativity. In Relativity, confirm that you have the appropriate system admin permissions to install an application. For more information, see Workspace security.
Use the following procedure to install an application from the Application Library:
Global applications are not listed in the Select from Application Library option when attempting to add an application to a workspace.
 in the Choose from Application Library field.
You can install an application to the current workspace by importing an external file if the application has not been added to the Application Library tab. Relativity automatically stores shared components the application uses in the Application Library and overwrites any lower versions. Shared components may include event handlers, scripts, custom pages, mass operations, or agents. In Relativity, confirm that you have the appropriate system admin permissions to install an application. For more information, see Workspace security.
You can also use the Application Install API to import an application programmatically.
Use the following procedure to install an application from an external file:
in the File field to browse for the application file.Relativity Applications use .rap files. If you upload the wrong file type, the following error message appears: The uploaded file is not a valid Relativity Application file.
If the application includes a custom page of a restricted file type, you receive an error message and cannot install the application.
Relativity applications may contain saved searches that use keyword, dtSearch, and Analytics indexes. When you install the application, Relativity creates the folder structure used to organize the searches in the saved search browser of the workspace. It adds the saved search to the correct folder by matching the globally unique identifier (GUID). If it does not find a match, Relativity continues to traverse the folder structure to the root before creating the required folder. Otherwise, it adds any new or updated saved searches to the existing folder with the matching GUID, even if the user has moved the folder to a new location in the saved search browser. For more information, see Customizing locked applications.
While Relativity 9 and above assigns a GUID to any saved search added to an application, older versions of Relativity do not use GUIDs to identify saved searches. You can build an application using a saved search in a template workspace created before upgrading to Relativity 9 or above. However, deploying your application in a workspace created with this template results in duplicate copies of the saved search. Since Relativity identifies saved searches by GUID, it does not recognize that the legacy search in the workspace is the same as the search in the application, so it creates a new one with the matching GUID.
In general, you install these applications following the same steps used for other applications, but you may want to complete the verification steps before you install them in a workspace. If the workspace does not contain a dtSearch or an Analytics index with the same name as the one included in the application, Relativity creates it using the system defaults. The post-installation steps require you to build the index after Relativity completes this process.
When you install an application, all saved searches are public regardless of the permissions that you assigned to them in your application or folder structure. The ADS framework ignores any permissions or security assigned to a saved search added to an application during deployment in a workspace.
You may want to complete the following verification steps before you install an application containing saved searches using dtSearch and Analytics indexes to avoid possible errors:
To install the application, follow the instructions in Installing applications from the Application Library or Installing an application from an external file to a workspace.
If your workspace already contains a dtSearch or Analytics index, Relativity automatically maps it to the saved search using the index name and type. It ignores any spaces or case differences in the index name.
If your workspace does not contain an index with a matching name or type, Relativity creates a shell for a dtSearch or Analytics index. You need to complete one of the following steps to build the index:
When you import an application, you can optionally map the fields that are similar to those in an application currently installed on the workspace. You can use mapping to avoid having multiple copies of a field that stores similar information in your workspace.
For example, you might import a new application that contains a long text field on a Document object called Email Cc, but your workspace already contains another application with a similar field on the Document object called Email Cc Addresses. Instead of two fields storing similar information, you might want all applications to use the same field for this metadata. By mapping these fields, you can avoid renaming the new field and using two different fields to store this metadata in your workspace.
Use these guidelines when mapping an application to workspace fields:
Use the following procedure to map application fields to workspace fields:
Locate the Map Fields section on the application form. The Map Fields section displays the mapping interface if the application contains fields corresponding to those in the workspace.
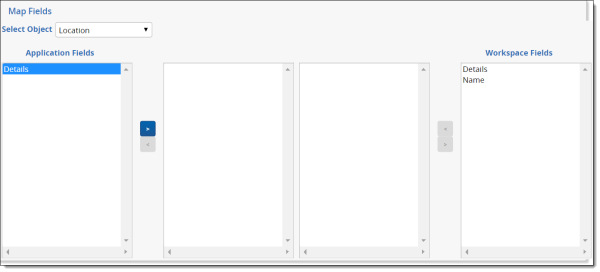
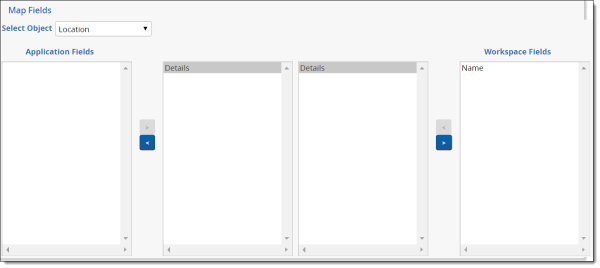
Highlight a field in the Workspace Fields box, and then click the left arrow to move it to the center box.
You can also double-click a field name to move it to a mapping box. To remove a field from the mapping box, use the left arrow for the application fields, and right arrow for the workspace fields.
Including imported fields in text index requires the index to be rebuilt and can impact Relativity performance. By default, the fields imported with Relativity applications are not included in text index even if the Include In Text Index property is set to Yes. You can use the
The UpdateIncludeInTextIndexOnRapImport must be used only when existing fields conflict with imported application fields, and by default existing field settings take precedence.
After you install an application through the Relativity Application tab, you can view the status page, which appears immediately after this process completes. The Import Status section indicates whether your installation was successful.
The Artifact Name section displays a list of all the artifacts in your application, which includes its Artifact Type, Artifact ID, and installation status. For artifacts installed without errors, the Status column displays the message Updated successfully.
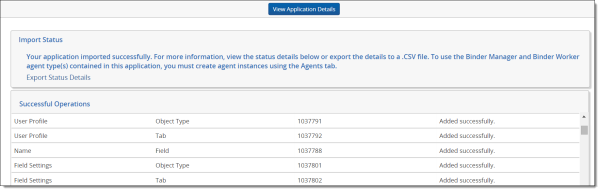
For unsuccessful installations, the Import Status section indicates that your application installation failed as illustrated in the following message. The message lists the number of errors encountered during the installation. In addition, the Status column describes each error that occurred during a failed installation. For more information, see Troubleshooting application installation errors.

To export the Status section report to a .csv file, you can click the Export Status Details. You can also view status information for the installation of an application from the Application Library tab. Click on an application to display a detail view, and then click its Installed link to display the status page.
