Feedback

This step is required for Environment Watch. The Environment Watch monitoring agent installation should start on the SQL Primary server, verify the installation, and then be applied to other servers in the environment. This ensures proper setup and validation before deploying across all servers.
This document outlines the steps to install the Environment Watch monitoring agent.
Decide which certificate option to use before you start. If the Elastic Stack was installed in the default all-in-one mode, elastic-certs.zip does not exist. In that case, select Use existing Elastic certificates in step 2 instead of the default option, and make sure this server trusts the Elastic CA certificate. See Use existing Elastic certificates.
elastic-certs.zip is on the BCP share at <BCP share>\EnvironmentWatch\, for example \\<sql-primary>\BCPPath\EnvironmentWatch\elastic-certs.zip. To find the BCP path, open the Server tab in Relativity and check the BCP path of the SQL - Primary server. For details, see Custom JSON Troubleshooting.elastic-certs.zip for the computer account of the server (DOMAIN\<server>$) or the Domain Computers group, when you select Install certificates from the BCP share. The installer reads the share as the Local System account, not as the Relativity Service Account.C:\Server.Bundle.x.y.zRelativity.EnvironmentWatch.Installer.xx.x.xxxx.exe. The license page opens.domain\Username) and Password. The fields are enabled only when the option is selected. The service account must be provided here when Relativity is not installed on the host.elastic-certs.zip is on the BCP share. Otherwise, select Use existing Elastic certificates. The options are described in Elastic certificate setup.Open Services and verify that the Relativity Environment Watch service is running.
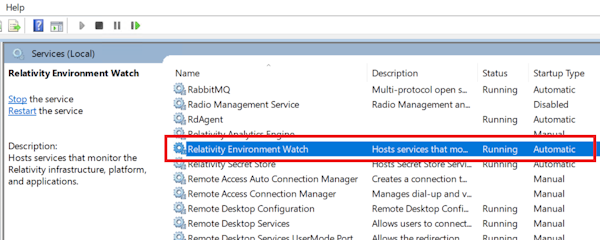
Open Task Manager and verify that the following processes are running:
rel-envwatch-service.exe
rel-infrawatch-agent.exe
otelcol-relativity.exe
Verify that new log files are created in the following folder:
C:\ProgramData\Relativity\EnvironmentWatch\Services\InfraWatchAgent\Logs
Verify that the otelcol-config-auto-generated.yaml configuration file is generated in the following folder:
C:\ProgramData\Relativity\EnvironmentWatch\Services\InfraWatchAgent\
If you selected Install certificates from the BCP share, verify that the Elastic CA certificate is listed in Local Machine > Trusted Root Certification Authorities (certlm.msc) and that the files listed in Install certificates from the BCP share (default) exist.
In Kibana, navigate to Dashboards and open the [Relativity] Host Infrastructure Overview dashboard.
Verify that CPU, RAM, and Disk metrics are visible for the newly added host.

Open the [Relativity] Monitoring Agent dashboard and verify the following:
After verifying the first installation, repeat these steps for the remaining servers in the following order:
Each server runs its own certificate setup. With the default option, the computer account of every server must be able to read elastic-certs.zip on the BCP share.
For troubleshooting, refer to the installer logs in the %TEMP% directory or see the Monitoring Agent Troubleshooting Guide.
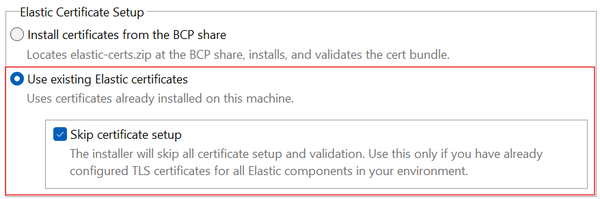
The installer can install the certificate authority (CA) certificate for you, or use certificates that are already in place. Select one of the following options in the Elastic Certificate Setup section of the options page.
| Option | Use when | What the installer does | Registry result |
|---|---|---|---|
| Install certificates from the BCP share (default) | elastic-certs.zip is on the BCP share (generated with relsvr.exe generate-certs, or with relsvr.exe install for a multi-node Elastic Stack). |
Reads elastic-certs.zip from <BCP share>\EnvironmentWatch\, copies the CA certificate to the Elasticsearch, APM Server, and Kibana certificate folders, and imports it into the Local Machine > Trusted Root Certification Authorities store. Then validates the Elastic Stack connection over TLS. |
ConfiguredBy=ZipInstalled
|
| Use existing Elastic certificates | The Elastic CA certificate is already installed on this server (for example, by your own automation), or elastic-certs.zip is not available (for example, the Elastic Stack was installed in the default all-in-one mode, which does not produce this file). |
Does not install any certificate. Validates the Elastic Stack connection over TLS. | ConfiguredBy=External
|
| Skip certificate setup (appears only when Use existing Elastic certificates is selected) | TLS is already configured for all Elastic components and you do not want the installer to validate the Elastic Stack. | Skips all certificate setup and the Elastic Stack validation. | No registry entry is written |
If an installation fails at the Elastic Stack validation, the ElasticCerts registry key remains, because the installer writes the key before the validation and does not remove it when the validation fails. On the next run the installer skips the certificate installation, whichever certificate option is selected. To select a different option after a failed installation, delete the key first. For the steps, see Elastic Stack validation failed after the certificate setup.
When this option is selected, the installer copies the CA certificate (ca.crt in the archive) to the following files. The Elasticsearch copy is named http_ca.crt:
| Component | Destination |
|---|---|
| Elasticsearch | C:\elastic\elasticsearch\config\certs\http_ca.crt
|
| APM Server | C:\elastic\apm-server\certs\ca.crt
|
| Kibana | C:\elastic\kibana\config\certs\ca.crt
|
The installer aborts if elastic-certs.zip is not found at <BCP share>\EnvironmentWatch\, if it cannot determine the BCP share path of the Relativity SQL Primary server, or if the archive is not valid.
The installer creates the certificate folders under C:\elastic on every server where it runs and overwrites an existing ca.crt or http_ca.crt in them. On a server that hosts Elastic Stack components that use a different CA, select Use existing Elastic certificates instead.
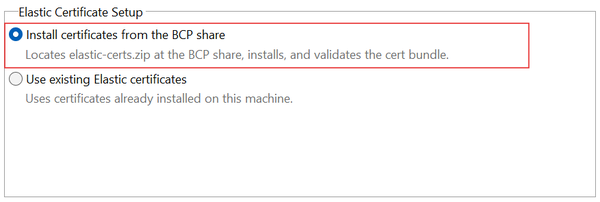
Select this option when the Elastic CA certificate is already installed on the server. The installer does not install any certificate.
The installer validates the Elastic Stack over TLS using the Windows certificate store, so the CA certificate must be in Local Machine > Trusted Root Certification Authorities. To check, open certlm.msc, expand Trusted Root Certification Authorities > Certificates, and verify that the Elastic CA certificate (the CA certificate file, ca.crt or http_ca.crt) is listed. To add it, import the CA certificate file into this store.
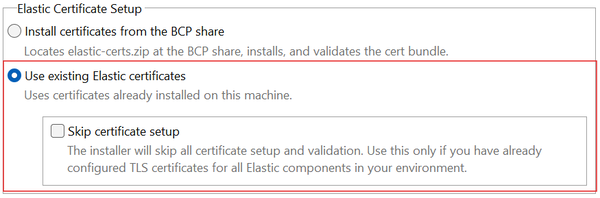
The Skip certificate setup check box appears only after you select Use existing Elastic certificates. Select it to skip all certificate setup and the Elastic Stack validation.
The installer does not detect missing or incorrect TLS configuration when certificate setup is skipped. Use this option only if TLS is already configured for all Elastic components.