


Feedback
Name normalization quick reference guide
Name normalization analyzes the email headers, both top-level and embedded, of parent emails. This process creates aliases which are linked to entities. Both aliases and entities are linked to the emails that they participate in. Entities can be pre-populated prior to the name normalization process from other Relativity applications, or from other workspaces. For instance, you can import people subject to Legal Hold as entities to be used by name normalization.
This quick reference guide provides high-level instructions for running name normalization and various workflows for using its results. Note that some steps might not be necessary to your use case, but we still recommend you review each section to understand what might apply to your situation.
For more detailed instructions, see the Analytics section of the documentation site.
Special considerations
Email header format is important. Name normalization recognizes many different email header formats, but it sometimes fails to extract aliases correctly if they are delimited by commas instead of semicolons (;). Consider replacing commas with semicolons in the To, CC, and BCC fields before running the name normalization if you know those fields use commas to separate multiple recipients.
Requirements
- Relativity version 10.0 or higher.
- Relativity Analytics is installed.
- Analytics Servers have been upgraded as required when upgrading Relativity.
Pre-work
Before running the name normalization operation, complete the following pre-work.
Create and tag entities: custodian, key people, other known participants
Import or create entities
You can import entities for Name Normalization, just as you can import them for Legal Hold, Processing, or Case Dynamics. You can also create entities individually.
Legal Hold and Processing previously had these entities stored in a Custodian object.
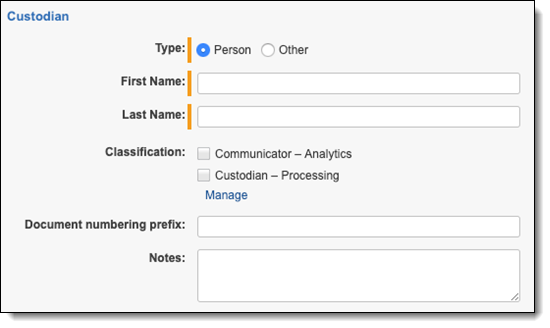
When uploading entities, include the following fields
- Full Name (must be unique)
- First Name
- Last Name
- Type (usually “Person”)
It is also usually best to upload at least one alias for each entity. Adding aliases is described below.
In addition to the people used by the other Relativity applications mentioned above, you might also choose to import entities that you know will correspond to the people communicating in emails. We recommend you use the Entity object (rather than a simple choice or a custodian object) even if you are not using Relativity to process your documents.
Tag entities used by other applications
The Entity object contains a Classification field which can contain both system-created and custom choices. It’s best to flag all entities created prior to running Name Normalization by mass editing them on this classification field. For instance, for entities created as custodians by Relativity Processing, or created as custodians for third-party or externally-processed data, you should check the box next to the Custodian – Processing choice. This choice is system-created by the Processing tool, but you can create a similarly named choice if you want to tag custodians but don’t have Processing installed.
Create aliases and assign to pre-created entities
To ensure that name normalization incorporates pre-existing entities in its results, we recommend you create at least one alias to go with each pre-existing entity. We strongly recommend that you conduct this process by importing from an alias load file (either brought over from another matter or constructed in a tool like Excel). The fields would be the same as described below in the manual process.
To manually create an alias and assign it to an entity, complete the following:
- Create the entity and mark it on the Classification field as described above.
- From the Aliases tab on the entity layout, click New Alias to create a new alias for this entity.
- Under Name, specify the alias in a way that you would expect it to appear in your emails. You should inspect some emails for guidance, but in general, typical formats are as follows, in order of importance:
- Email address, such as john.doe@corporation.com
- Proper name, such as John Doe or Doe, John
- Extended email address, such as John Doe [john.doe@corporation.com]
- Under Type, select the appropriate alias type as described above. Email address, Proper name, or Extended email address are by far the most common.
- If you are using type Email Address or Extended Email Address, set the Domain and the Primary Domain. For most aliases, they will be the same. The exception would be a three-part domain such as “mail.enron.com” which would have a primary domain of “enron.com”.
The following is an example of what your alias might look like:

Save aliases or entities as backup
If you created aliases manually, we recommend you back them up to a file in case you need to recreate them later or import to another workspace. You can do this by running a mass export or the Relativity Desktop Client, saving the file as CSV or DAT format. Note that “Full Name” is the identifier used during import, and we recommend that you take measures to keep these names completely unique to avoid record collisions.
Running the name normalization operation
To run name normalization, complete the following.
Create a saved search for emails
You must create a saved search on which to run name normalization. Because name normalization only operates on emails, it is not necessary to include non-emails in your saved search. Note that documents formatted like emails which are saved in non-email formats such as text, PDF, or Word may be recognized as emails by the name normalization process.
To prevent possible “over-merging” of entities, you may choose to start with a subset of emails for your initial saved search. For instance, if you are primarily planning to use name normalization for building out privilege logs, restrict your search to just privileged emails to get higher quality results on the most important entities.
As with all structured analytics operations, the fields returned by your saved search do not factor into the behavior of the algorithm—it will always operate on extracted text plus the email fields that you map in your Analytics profile.
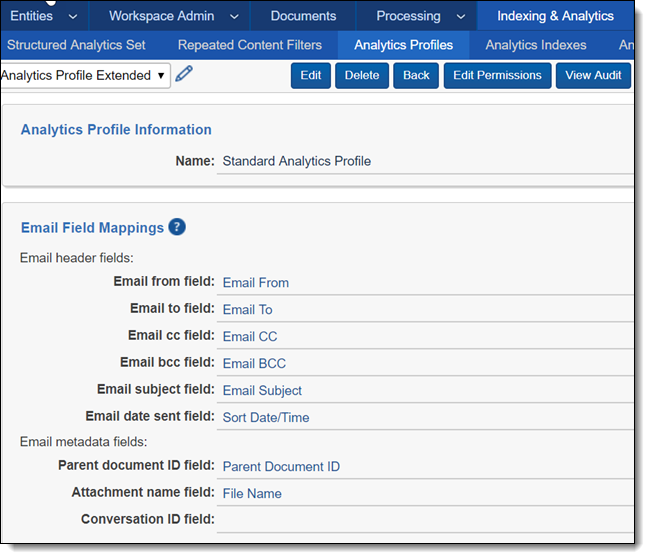
Set up the Analytics profile
On the Analytics Profile tab, verify that an appropriate Analytics Profile already exists or create one. Although all required fields must be set in your Analytics Profile, only the following fields are used by the name normalization operation:
- Email From
- Email To
- Email Cc
- Email Bcc
- Parent Document ID
Create a structured analytics set
- Select a saved search. This search can have all documents included but will be most efficient if you remove all attachments and any non-emails from the search.
- Under Select operations, check the box for Name Normalization. It is usually best to run Name Normalization on its own, though it’s possible to run it alongside other operations if you need to.
- In the Email Headers section, choose your Analytics profile.
- Leave Use email header fields set to Yes.
- Under Email header languages, leave English selected, and add any other languages that you believe might appear in your email header formats. It’s usually better to be over-inclusive, as additional languages only slow the algorithm slightly.
- Click Save.
Run name normalization
To run name normalization:
- Click Run Structured Analytics in the console.
- Click Run in the modal window that appears.
Post-run: verify and clean your results
Name Normalization can create many thousands of entities and aliases. The algorithm is quite data-dependent, and the results are not perfect. As such, there are tools available in the Entities and Aliases tab to refine Name Normalization’s outputs, which we describe below.
For most large workspaces and most applications, it’s not practical to verify the correctness of every entity. You should prioritize the most important entities, including those appearing most often and entities related to privilege coding if you need to create a privilege log. Our suggested order of priority for cleanup is as follows:
- Custodians
- Key Entities (non-custodian)
- Largest Entities (as seen in Communication Analysis)
- Privilege Entities (can be raised in priority if privilege logging is your main usage of entities)
- Other
Restricting your saved search to a subset of documents (such as only your privileged documents) can help reduce the amount of cleanup that you need to do. We strongly recommend this method if you are not as interested in all entities across all emails and are instead mostly focused on privilege logging.
The default views and layouts for aliases and entities are locked as part of a system application and cannot be modified. We recommend creating your own views and layouts if you want other fields. You can also reduce the Order field on those views/layouts to make them appear by default.
Delete aliases and re-run
If you determine immediately that something has gone gravely wrong, it is best to delete all entity and alias results and start again. Examples of what might go wrong and how it might appear include the following:
- Far more Entities or Aliases than you expected. Generally, the number of aliases and entities will be less than the number of documents, though this is substantially data dependent. This can occur if you improperly mapped your Analytics profile or had poorly formatted extracted text.
- Far fewer Entities or Aliases than expected. This can occur if you failed to include some prevalent header languages.
- Some entity document fields are not populated. You should generally see that all emails have an Entity From and Entity Participant set, and almost all emails have Entity To and Entity Recipients. A minority of emails have Entity CC set, and very few emails have Entity BCC. If Use email header fields was set to Yes, the algorithm looks to both your email fields and your extracted text to find this information.
To delete all data and re-run, carefully perform the following steps in the order listed. Performing the steps out of order will cause the data to not be fully removed:
- On the Aliases tab, select ALL aliases and mass-delete them. If you do not delete all aliases, you must delete them 50 (or fewer) at a time, which is generally not practical.
- On the Entities tab, delete any entities created by Name Normalization which you do not want to keep. This is usually done by searching on the Classification field and is the reason that the classification field is important to set up ahead of time. Do not delete entities with a Classification of Key (related to Case Dynamics) or Custodian—Processing (related to Processing).
- Re-import the aliases which you imported earlier from load files. If you manually created aliases and exported a backup, you can import this backup now.
Clean up entities and aliases
The following steps are commonly used to clean up your highest priority aliases and entities. You should expect some degree of verification and cleanup on any name normalization run due to the natural ambiguity and formatting anomalies present in email data.
Some steps, such as correcting under-merged entities, are conducted on the Entities tab. Others, such as correcting over-merged entities, are conducted on the Aliases tab. You’ll often find yourself switching between the two tabs.
Merging entities
When you see two entities that should become a single entity, use the Merge mass operation on the Entities tab. Commonly, these entities might have similar full names such as “Doe, John”, “Doe, John (1)”, and “John Doe”. Use filters to find these variants, as seen in the following screenshot.
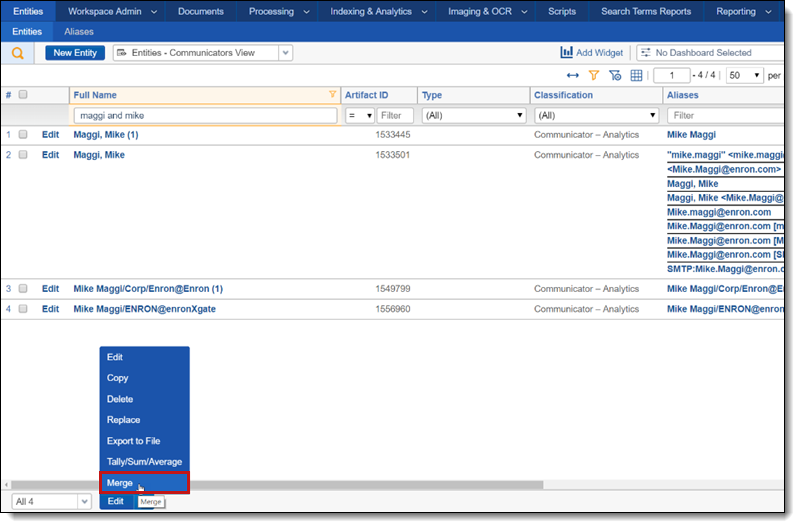
The selected entity with the lowest Artifact ID will be the full name used by all items merged, unless a Legal Hold or Processing entity is present in the merge in which case it takes precedence. Data across all merged entities is merged together; in cases where field types which cannot be merged, the lower Artifact ID gets preference.
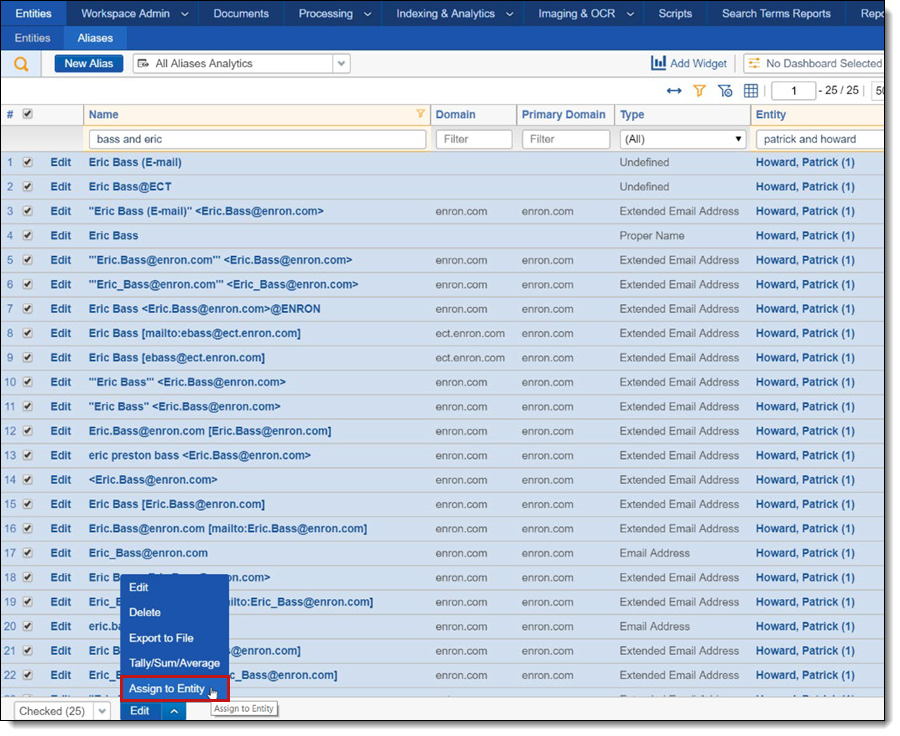
Reassigning aliases
When an entity contains aliases that belong to another entity, you can reassign those aliases on the Aliases tab. Again, filter for the entity or alias that needs assignment, then use the Assign to Entity mass action to reassign them. Note that an alias cannot be assigned to no entities, so you should ensure that a target entity exists before you assign to an entity.
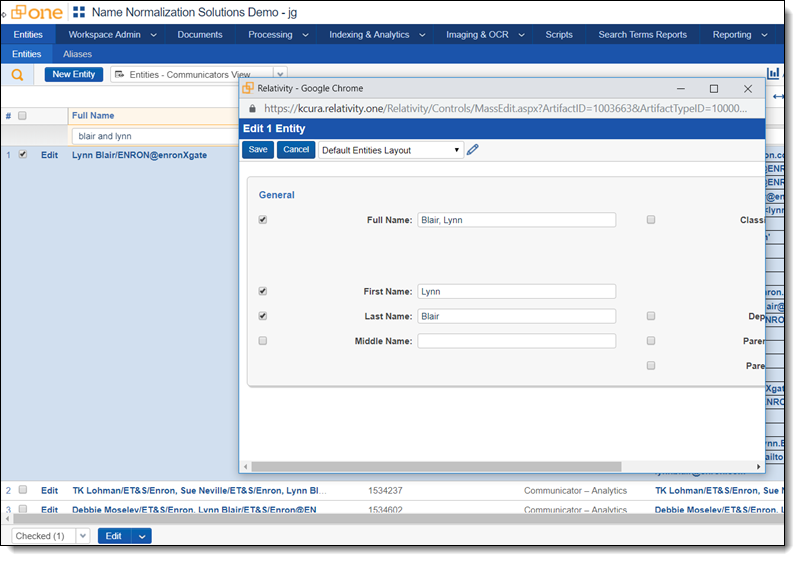
Editing an entity
Sometimes entity naming is less than ideal, particularly after merging. In these cases, it’s useful to edit the entity and change its Full Name or First Name and Last Name fields. You can do this through the Edit mass action from the Entities tab, or by clicking into the entity and editing it through the layout. The mass action version is a bit quicker lets you skip fields required by the layout.
Editing aliases
Though less common than editing Entities, fields on the Alias object can also be edited. Note that we never advise editing the Name field for an Alias that was created by Name Normalization, as it prevents Relativity from finding that alias in documents on an incremental run of Name Normalization.
Using custom fields or choices to manage the cleanup process
The process of cleanup can be streamlined and handled by multiple people by using custom fields on the alias or entity object. For example:
- Create a Merge Entity Status field that includes the state of the merge process. Choices could include “In Progress”, “Completed”, and “Further Review”.
- Create a Needs Name Normalization Re-Run field for cases where you need to delete malformed aliases and have Relativity re-link to newly created aliases. This is most common if you fix formatting in the text or metadata fields.
- Create an entity called Junk, and collect aliases that are the result of erroneous header detection.
- Create an entity called Needs Attention. Aliases that are not easily remedied can be mass moved to the Needs Attention entity temporarily.
- Consider having some users triaging entities and aliases with these fields, and others resolving the issues. For instance, someone intimate with the case could prioritize key entities, and a paralegal could then go through these, finding and fixing entities and aliases associated with these key people.
Use Communication Analysis to find anomalies
The Communication Analysis widget can help you spot problems with entities that appear as senders or recipients of top-level emails. Common issues include large nodes with poor names and multiple large nodes that might be the same entity. You can also restrict the view to documents of interest (such as those marked privileged) to QC the communicators participating in those documents.
Find the most common entities to look for over-merging
Add a widget to the Aliases tab to find the most common entities. These entities are often where over-merging has occurred. As mentioned in the previous bullet, this work can be streamlined with the use of custom fields or choices.
To create the widget, on the Aliases tab, click Add Widget and configure as follows:
- Group By – Entity
- Group By Results Returned – Top 100
- Default Display Type – Table (or Pie Chart or Bar Chart if you prefer)
In some cases, there are too many aliases for the results to appear. If this occurs, try creating a random sample of 15,000 aliases by clicking the Sampling icon in the upper right.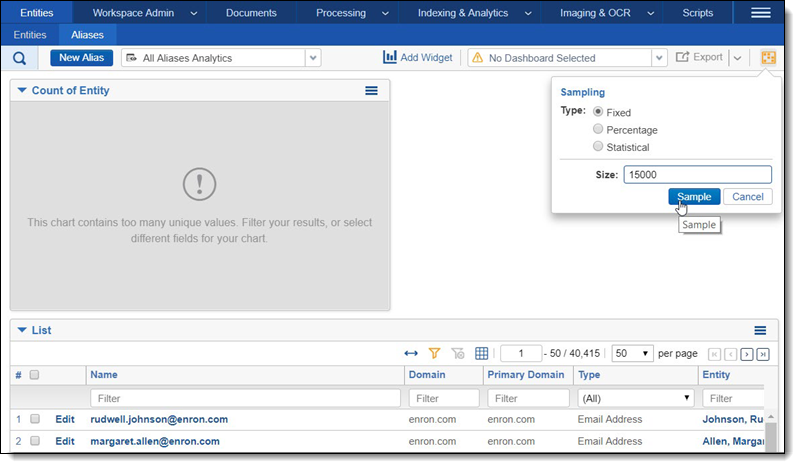
The random sample will yield the most common entities. You can select the entities from the chart and then clear the sample if you want to start re-assigning or mass-editing all the associated aliases.
Focus on the entities that appear in specific documents
If you just want to QC the entities that appear on your privileged documents, follow these steps:
- Change the Open to Associations setting on your Privilege Designation field to Yes.
- Navigate to the Entities tab and add a search condition on the Entity Participant field.
- Select Entity Participant::Privilege Designation for your search condition.
- Select the Is Set operator or select the designations you want to focus on.
- Run the search and view the entities that are participating in privileged communications.