


Feedback
Integrating Azure AD for Custodian Portal SSO
To complete the set up of SSO authentication using the Azure AD provider, you need:
- Log into your .onmicrosoft.com account.
- Azure user must have sufficient access to create, register, and modify Azure applications.
- Azure Active Directory with at least one user.
- A Relativity user with Workspace Admin rights.
- Additional people as custodians to assist in verifying Portal SSO access.
- Portal Settings have been populated within Legal Hold Settings.
For more information, see Custodian Portal Authentication Provider.
This documentation contains references to third-party software, or technologies. While efforts are made to keep third-party references updated, the images, documentation, or guidance in this topic may not accurately represent the current behavior or user interfaces of the third-party software. For more considerations regarding third-party software, such as copyright and ownership, see Terms of Use.
Registering an Azure application and credentials
Portal SSO authentication requires a reference to a dedicate Azure application that has the appropriate permission. This needs to be done on the client side by an Azure user with sufficient rights.
Register the Relativity application to gain access to Microsoft Azure AD. Access to Azure AD gives Relativity the ability to complete multiple tasks.
Start registering your app by following the steps below:
The application registration process needs to be done by an Azure Administrator with sufficient privileges.
- Open your Azure Portal.
- In the left-navigation menu, click App registrations.
- Click New Registration.
This will open the Register an application page. - Enter an application name in the Name field.
- Select Accounts in this organizational directory only as the supported account type.
- Click Register.
Creating a client secret
A client secret from Microsoft Azure AD is needed to integrate Microsoft and Relativity.
To create a client secret:
-
In the left-navigation menu, click Certificates & secrets.
-
Navigate to the Client secrets tab.
-
Click the New Client Secret button.
Do not navigate away from the page once the client secret is created.
-
Populate the Description and Expires fields. You can leave the default, or recommended, values.
-
Click the Add button.
If the client secret was successfully created, you will see the Client Secret displayed on the table and the Value field should be displayed in plain text. -
Copy the Value field and store it safely.
If you leave the page and comeback to get the value the Value field will be masked and you will not be able to copy it
You can repeat steps 4-5 to generate a new client secret.
Setting API Permissions
Open the application to view the application's homepage. From the app's page, add permissions to the web API.
To add permissions:
- Click API permissions.
- Click Add a Permission.
- Click Microsoft Graph.
- Select Delegated Permissions.
- Select the User - User.Read option from the Delegated Permissions section.
- Click Add Permissions.
- Click Grant admin consent for Relativity.
At this point the Application should be full configured. It can take a few minutes to update
Editing the custodian portal authentication provider
Continue adding the Azure AD application by navigating to the Custodian Portal Authentication Provider tab located within the Hold Admin tab.
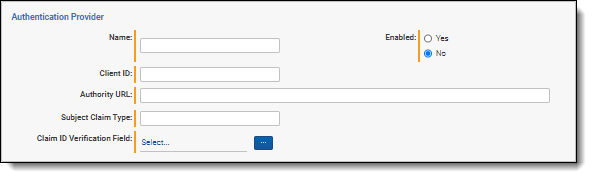
Do the following on the Custodian Portal Authentication Provider tab:
- Click Edit.
- Enter information in the following fields:
- Name—the application name.
- Enable—select Yes to enforce SSO Portal authentication for this workspace.
- Client ID—the organization's security and compliance identifier. This is the Application (client) ID in the App Overview page in the Azure Portal.
- Authority URL—the authenticated URL provided by organization's SSO provider. Relativity redirects to the next Redirect URL, which is the Custodian Portal URL.
- Example of Azure URLs
- https://login.microsoftonline.com/mydomain.com
- https://login.microsoftonline.com/tenantid
The TenantID is unique identifier (Guid) of your Azure tenant (domain). The Directory (tenant) ID on the App Overview page in the Azure Portal. This information can be provided by your Azure admin.
- Example of Azure URLs
- Subject Claim Type—the information the SSO provider verifies the custodian's identity.
- The values are from the SSO Provider. If unsure about what to enter, type UNKNOWN. Some Azure claim types are:
- http://schemas.microsoft.com/identity/claims/objectidentifier (recommended setup)
- http://schemas.xmlsoap.org/ws/2005/05/identity/claims/upn (easiest setup)
- The values are from the SSO Provider. If unsure about what to enter, type UNKNOWN. Some Azure claim types are:
- Claim ID Verification Field—the value which will be used to match value coming in selected Subject Claim Type.
- Select Entity field where you expect to have a value which will be used to match value coming in selected Subject Claim Type.
- If you are not sure at this time, please select UniqueID.
- Click Save.
- After refreshing the page, the Redirect URL value is populated with the unique link. Copy the Redirect URL and use it in the next section.
The RedirectURL, a read-only value, is the URL which the SSO provider uses to redirect back to Legal Hold Portal after successful custodian authentication.
Configuring the redirect URL
You will use the copied Authority Redirect URL from the Custodian Portal Authentication Provider tab in the previous section in this section. Navigate back to the newly created application in Azure Portal window.
In Azure Portal, navigate to the Overview page for the application being used for the integration and follow the steps below.
- Using the left navigation column, click into the Authentication page.
- Click the Add a platform button.
- Click the Web drop-down text.
- Paste over the Redirect URL you generated earlier.
- Click the Configure button.
For more information on adding a redirect URL to Azure, see Microsoft’s documentation.
It can take up to 10 minutes until the Custodian Portal Authentication Provider settings to go into effect. To speed up the update, you will need to create/modify Instance setting with a shorter time rate refresh.
Enabling ID tokens for Azure application
Follow the steps below to enable ID tokens for the Azure application for Custodian Portal SSO.
- In the left-navigation menu, select Authentication.
- Scroll to Implicit grant and hybrid flows section.
- Check the ID Tokens (used for implicit and hybrid flow) box.
- Click Save.
Troubleshooting Claims
If unsure about what to put under the Subject Claim Type and Claim ID Verification Field columns in SSO setup, you will need to use the Troubleshoot Claims option.
- Click Troubleshoot Claims.
- The top of the Troubleshooting Claims page, under Main Claims, includes TenantID information. This value corresponds to currently accessed unique identifier of your Azure tenant (domain). This information can also be used for "Authority URL" as described above. The Troubleshooting Claims page has three columns:
- Claim Type—lists all claim types which were transmitted by Azure AD authentication provider.
- Claim Value—contains corresponding value for each claim type transmitted.
- Potential Claim ID Verification Field—contain potential corresponding Entity field(s) where matching values were detected.
- Only populated if your Relativity account, which you currently logged in under, has corresponding Custodian (Entity) entry with the same email address. So, to help with this troubleshooting process, it would be recommended to import such Custodian before.
- Looking at the data on this page helps to select proper Claim Type and Relativity Entity field values to populate the Subject Claim Type and Claim ID Verification Field respectively.
- Make necessary changes to Custodian Portal Authentication Provider settings at this time. It might take some time for this change to go into effect.