


Feedback
Importing data
You can use the RPC to import data into a store. The RPC extensively uses the job queue to distribute the import workload across multiple machines in order to maximize processing resource efficiency.
Creating a data store
Before you can import data, you must create a data store in the RPC, which adds a new database to the SQL Server. Data stores allow you to organize your data by a store, group, project, and custodian. This organization allows you to optimally use the RPC when you perform text extraction, generate images, filter, and export.
You can't create a data store enabled for DataGrid.
Any databases that you create in Relativity also appear in the RPC. See Working with Relativity-generated data stores.
The RPC is designed to work in distributed environment across multiple SQL, file, and worker servers. You may see multiple SQL Servers listed in the Data Store window.
To create a data store:
- Open the RPC.
- In the Data Stores window, right-click on an SQL Server.
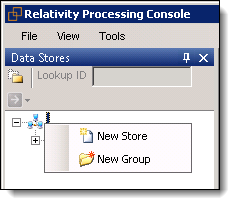
- Choose one of the following menu options:
- New Store - creates a new database on the server.
- New Group - creates a group that you can use to organize data stores. For example, you can add all data stores for the same customer to a group.
You can delete groups but not data stores. You can hide a data store by right-clicking the data store and select Hidden.
Once you've created a data store, you can import data. See Importing data.
Working with Relativity-generated data stores
You can use the RPC export feature to generate a load file from a Relativity-generated data store. For example, you may want to create a load file for Relativity import. See Exporting data.
Importing data
Once you create a data store, you can add documents to the RPC by importing them to a data store. The RPC extensively uses the job queue to distribute the import workload across multiple machines in order to maximize processing resource efficiency.
The RPC generally uses the following workflow to import data (such as a PST file) from a hard drive:
- Identifies the file type, and calculates the hash for the file so that it can be copied to the network. These hashes are later used for deduplication filters. See Filter types.
- Calls the specific handler for the file type, and passes in the required parameters. Each file type has its own handler (or plugin) that requires its own set of parameters.
- Adds job to the queue so worker can execute the method for opening the file (such as a PST), count the items in it, and add 100 item groups to the job queue.
- Extracts first group of, for example, 100 items from a container file and adds them to the queue as a job. Continues with the second group of 100 items, and so on (Multiple workers may be running these jobs.)
- You may see something different than a 100 items in your queue for a container file. This is because for large container files, the RPC breaks the job into a number of smaller sub jobs, and this number is not fixed. It varies, as it depends on the original size of the container file.
- Adds jobs for attachments to the queue, jobs for metadata extraction, and so on. This process continues until there are no remaining sub tasks to add to the queue.
The RPC extracts only metadata from the files during an import job. See Extracting text for more information.
Import jobs
Create an import to organize your data in a single database (data store). For example, you create a project and designate different custodians under that job. Use jobs to determine your export sequence.
Prioritizing custodians for de duplication is not supported in the RPC. Custodian order is determined during ingestion. These settings can be changed at any time including during the import process.
To create an import job:
- In the Data Stores window, right-click a data store.
- Navigate to Tasks > Import.
- From the Create Data Import Job dialog, enter or select the information for the following fields:
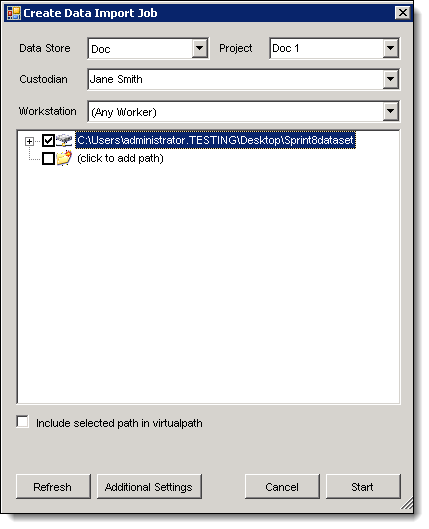
- Data Store - the selected data store displays by default. Select another data store from the drop-down list.
- (Optional) Project and Custodian - enter names for these fields. These names display in the Data Store window.
- Project - the project that you want to specify for the data import job.
Custodian - the custodian that you want specify in the project.
You can import data without defining a project or custodian. You can change these settings at any time, including during the import process.
- Workstation - select the machine with the data that you want to process. When you select a workstation, the List box displays all the drives and CD-ROMS available on that computer, so that you can make them visible to other worker machines. This option is useful if the data resides on a CD-ROM, USB drive, or other physical media that is associated with a specific worker machine.
- Use one of the following methods to select the folders or files that you want to import:
- Expand and drill-down in the Server List box to locate the required data. Select the check boxes for the folders or files.
- Select the check box for Click to add path. Click this box to clear it, and paste or type the path to the import folder. You can use this option if the data is already on the network.
- If you select a checkbox for a folder, the RPC imports all of its content even though you won't see the individual check boxes for the documents selected when you expand the list.
- You have the option of adding a SQL setting if you have a fixed import location that you would like to select in the folder window. To do this, go to the Invariant database, add an entry to the AppSettings table with a category of MapVolume, and enter the UNC path from which you'd like to import in the Value2 column. Keep the other columns as NULL. You can app multiple MapVolume entries to this table.
It is possible to add a SQL setting if you have a fixed import location that you would like to see as a location to import data from. In the Invariant database add an entry to the AppSettings table with a category of ‘MapVolume’ and enter the UNC path you would like to import from in the Value2 column. The other columns should stay as NULL. Multiple MapVolume entries can be added to the table.
- Choose the option Include selected path in virtual path if you want the virtual path to start at the server name rather than lower in the path hierarchy. If you don't select this option, the path starts with the folder name.
- Click the Additional Settings button.
- In the Job Settings dialog, select the Import tab.
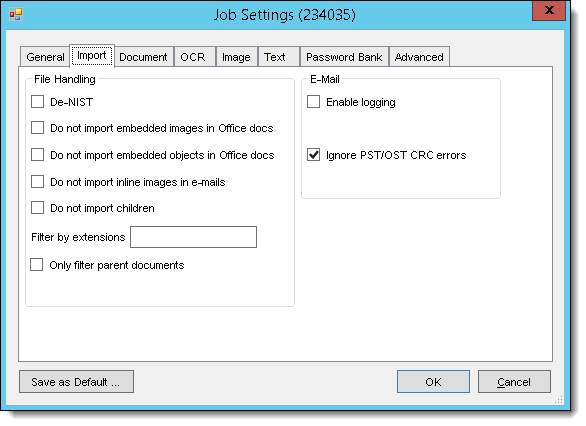
- Select any of the options listed in the following table.
Options Select this option if you want to... File Handling
De-NIST
Remove known system files from a set of data. The RPC uses the database provided by the National Institute of Standards (NIST), which includes approximately 14 million unique SHA-1 hashes for known system files, such as kernel32.dll, user32.dll, and others. These files can automatically be eliminated from a forensic collection because they are not custodian created files. (There is discoverable information in files on the NIST list, but none of it is pertinent to the case/matter unless you're using NIST.)
Do not import embedded images in Office docs Excludes various image file types found inside Microsoft office files. For example, .JPG, .BMP, or.PNG in a Word file. Do not import embedded objects in Office docs Excludes various files found inside Microsoft Office files. For example, an Excel spreadsheet in a Word file. Do not import children Performs a one for one import of the files selected for import extracting no children or embedded items. Do not import inline images in e-mails Excludes various files found inside emails. For example, .JPG, .BMP, or .PNG in an email file. Filter by extensions box
Exclude or include file types added to this text box during import. You can't select both in the same import. The RPC will filter on detected file extension, rather than the original extension.
To include a file type, enter a plus sign, file extension, and a semicolon. Replace the plus with a minus sign to exclude a file type as illustrated below:
- Include: +mpp;+msp
- Exclude: -mpp; -msp
You can choose to either include or exclude items on an import. You cannot have both in the same import.
Only filter parent documents
Applies filter only to top-level (or parent) and loose documents. Since this filters only top-level documents, all the associated attachments will be returned.
E-Mail
Enable logging
Debug or troubleshoot a job that crashed, or other minor performance issues. This log file is created on the C: drive of worker machine processing the file, and log file names use the storage ID of the worker. The file contains subject names, entry IDs, and other information.
Ignore PST/OST CRC errors
Ignores errors generated when a cyclic redundancy check is performed on PST files.
Time zone is applicable to OCR/imaging, text extraction, exporting, and publishing, but not importing. By default, the RPC stores date type metadata in the database in Coordinated Universal Time (UTC). While you can optionally set the time zone on the Job Settings General tab when importing, this information is required prior to running text extraction, imaging or exporting.
- Click OK to redisplay the Create Data Import Job dialog.
- Click Start. The import job moves into the queue, which displays in the Job Activity window.
- In the Job Activity window, highlight the import job, and select a Group for it. After a worker starts the job, you can monitor its progress in this window.
Once you've imported data to a data store, you can extract text. See Extracting text.

Troubleshooting import errors
The RPC imports all documents into the system, even those with unsupported file types. This comprehensive import allows you to run exception reports that list any files that the RPC couldn't process.
While the RPC can identify most file types, it doesn't have corresponding handlers for all types. The RPC imports unsupported file types but they aren't added to the job queue, and undergo no further processing. You can generate a detailed error report that lists these files as well as any password-protected files.
The RPC also collects the following import information found in various reports:
- De-Nisted Files - when the RPC discovers a file, it queries the NIST database for a match. If the file is found, the RPC doesn't import the file, but adds an entry for it to the De-NIST table associated with the job. This table can later be referenced to obtain a list of de-NISTed files.
- Bad container files - these files include containers without children, as well as password protected, incomplete, or corrupt containers that documents could not be extracted from. Common container file types include ZIP, RAR, NSF, and PST. You can use this information to troubleshoot these container files.
- File Details - the RPC captures detailed information about jobs in standard summary reports. See Running standard reports.
Generating job error reports
- In the Data Stores window, drill down to a completed import job. An import job is directly under a custodian.
- Right-click the import job > Discovery.
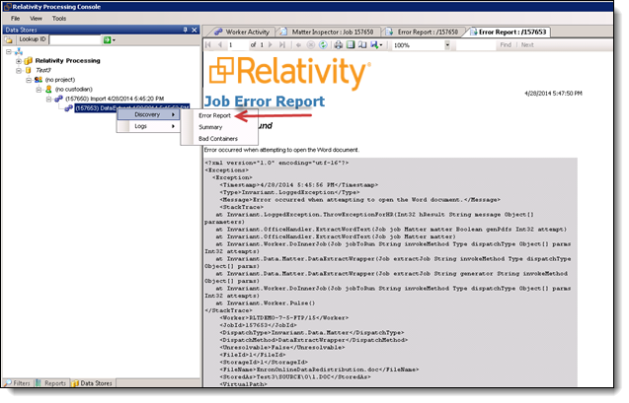
- Click a report type. The RPC generates the report and displays it in a new tab.
The following reports are available for troubleshooting an import job:
- Error Report - lists each error that occurred with detailed exception information. You can also run this report to troubleshoot extracted text errors and imaging errors.
- Summary - lists the frequency of each file type in the job, the total number of discovered documents and counts of de-NISTed files. It also includes file sizes of all files, de-NISTed files and the size of files remaining after de-NISTIng not counting containers. Additionally, there is a brief entry describing each error encountered during import.
- Bad Containers - lists all container files that Invariant was unable to pull any documents from. If a container throws an error on import but Invariant was able to get a single file from it, the container will not appear on this report however it will appear on the error report.
Each error listed in the summary report has a corresponding detailed version in the error report. If you reprocess error files and they don't encounter new errors, they will still appear on the report when you run that report again. If the reprocessed files encounter errors on the retry, these new errors are listed along with the original errors. The bad container report is dynamic, which means if a container was successfully re-imported, it doesn't appear on the bad container report when you run that report again.
See Running standard reports for information about other reports.