Markup sets
A markup set contains highlights and redactions grouped together so that they can conveniently be applied to documents in the Viewer.
For example, if you want to mark certain redactions as Confidential and others as Private, you can create a markup set containing the words Confidential and Private and apply them to your document set without manually entering the words for each textbox redaction.
The only proper way to secure the text behind a redaction is to the produce the document that contains the redacted text. If a group has View rights only to a markup set (not Edit or Delete rights) and a reviewer in that group loads a document in the Viewer because they have no other way to view that document, they can actually see the text behind the redaction.
While viewing a document, you can change markup sets in the drop-down menu and see different highlights and redactions in the document. Multiple reviewers can redact the same document at the same time using different markup sets.
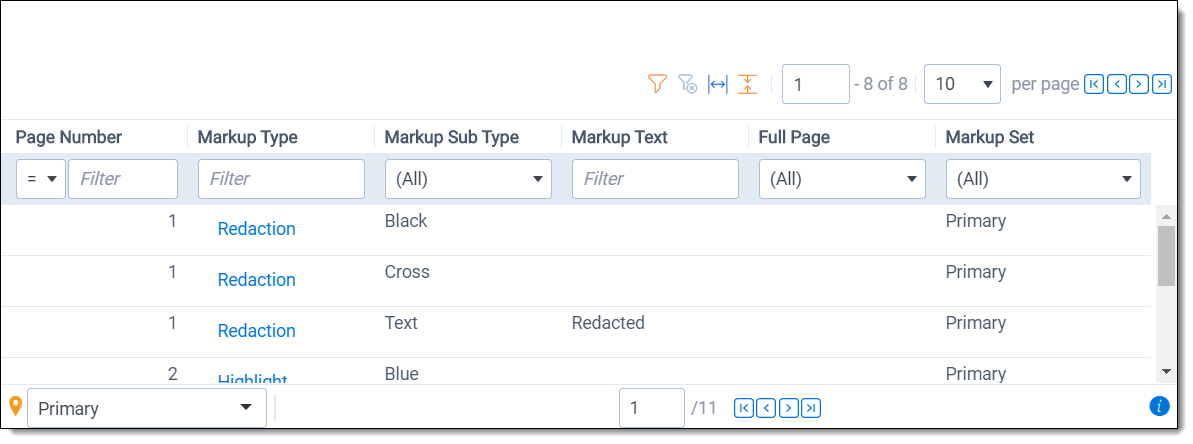
In the Viewer, you can locate markups in a document using the Markup Navigation pane. To open this pane, click ![]() in the lower left corner of the Viewer. The Markup Navigation pane displays a list of all redactions and highlights that reviewers created in the document, as well as references to their page numbers and parent markup sets.
in the lower left corner of the Viewer. The Markup Navigation pane displays a list of all redactions and highlights that reviewers created in the document, as well as references to their page numbers and parent markup sets.
You can click anywhere on the markup row to jump to the page where the markup occurs. In addition, Relativity updates the active markup set to the one associated with your row selection in the Markup Navigation pane.
Before you apply markup to a document, note that the Native Time Zone Offset field controls the date and time that displays on redacted and highlighted images. You may want to review and adjust the UTC value to avoid placing incorrect time designations on documents you intend to produce.
Permissions
The following permissions are needed to use each part of markup sets:
| Object Security | Tab Visibility |
|---|---|
|
|
Creating and editing a markup set
To create or edit a markup set:
- Navigate to the Markup Sets tab.
- Click New Markup Set. If you want to edit an existing markup set, click the Edit link next to the markup set name.
- Complete the fields on the markup set form. See Fields.
- Click Save.
Fields
Markup sets contain the following fields:
- Name - the name of the markup set.
- Order - indicates the placement of the markup set in the markup set drop-down menu in the viewer. Use the following guidelines when ordering markup sets:
- The Markup Set drop-down menu displays markup sets with low order numbers near the top of the list. (The default markup set has the lowest order number.)
- Sets with the same order number sort alphanumerically.
- You can use any positive or negative integer for the order number. You can't use a decimal as an order number.
We recommend ordering markup sets by groups of 10, such as 10, 20, 30, and so on. Using this numbering scheme you can easily insert another markup set without having to reorder the existing ones.
- Redaction text - enter the words or phrases that you want to set as textbox redaction options. To set multiple options, enter each term on a separate line.There is a limit of 15 text redaction options in a markup set. If there are more than 15 options in a markup set, they are not displayed in the right-click menu.
Copying markup sets
On the markup set list, you can use the Copy mass operation to duplicate a markup set. When you copy a markup set, you also copy any existing redactions that have been applied to documents.
For example, you redact documents with the markup set Attorney, and then you copy this markup set, and rename it Expert. In the viewer, you open a document previously redacted with the Attorney markup set, but now you select the Expert markup set. The viewer displays the document with the redactions previously applied with the Attorney markup set.
To copy a markup set, follow these steps:
- Navigate to the Markup Sets tab.
- Select the checkbox next to the markup set(s) you want to copy.
- Select Copy from the mass operation drop-down list, and click Go.
The markup set automatically copies and appears in the markup set list. To edit the name of the new markup set, click the Edit link, enter a new name, and click Save.When copying a Markup Set, any existing associated redactions on documents are also copied to the new Markup Set.


