


Feedback
OpenID Connect
OpenID Connect is an identity layer on top of the OAuth 2.0 protocol. You can verify the identity of the end user based on the authentication performed by an authorization server, as well as to obtain basic profile information about the end user. You can use any provider that supports the OpenID Connect protocol.
This documentation contains references to third-party software, or technologies. While efforts are made to keep third-party references updated, the images, documentation, or guidance in this topic may not accurately represent the current behavior or user interfaces of the third-party software. For more considerations regarding third-party software, such as copyright and ownership, see Terms of Use.
Configuring an OpenID Connect authentication provider
To add OpenID Connect on top of your OAuth2 configuration, enter the required information in the fields listed below.

Authentication Provider Information
- Name—enter a user-friendly name for the authentication provider.
- Provider Type—select OpenID Connect.
- Enabled—the provider is enabled by default. However, you can disable it.
- Site URL—set the URL that users enter in the browser to access an instance of Relativity.
Authentication Provider Settings
- OAuth2 Flow—select either Implicit or Code.
- Client ID—enter your application's ID.
- Display on Login Screen—determines if the OpenID Connect button displays on the login page.
- Login Screen Button Text—determines the text that appears on the button displayed on the login page.
- Authority URL—enter the URL that hosts the OpenID configuration well-known endpoint.
- Scopes—the default value for this field is openid. The openid checkbox must be selected because it's a required setting. However, you can also select the email or profile option. The identity provider responds with the claims associated with the scopes that you request. In other words, the scopes translate into claims that you can use.
- Redirect URL—After saving the new Authentication Provider RDO (Relativity Dynamic Object), it will be shown in the settings.
- Example—<https://company.relativity.one/Relativity/Identity D7158859-3355-46FB-96D1-78B1B0466AB1>
- Subject Claim Type—the default value for this field is sub. Enter one of the following values based on the scopes that you set:
- If you selected only OpenID in the Scopes field, this field must be set to sub.
- If you selected OpenID and email in the Scopes field, set this field to email.
- If you selected OpenID and profile in the Scopes field, set this field to a property available from the identity provider. These properties differ for each provider.
- Alternative Issuer(s) - set this field to the issuer in your OpenID configuration if it does not match your authority URL. Refer to your IT department for guidance on if this field needs to be set
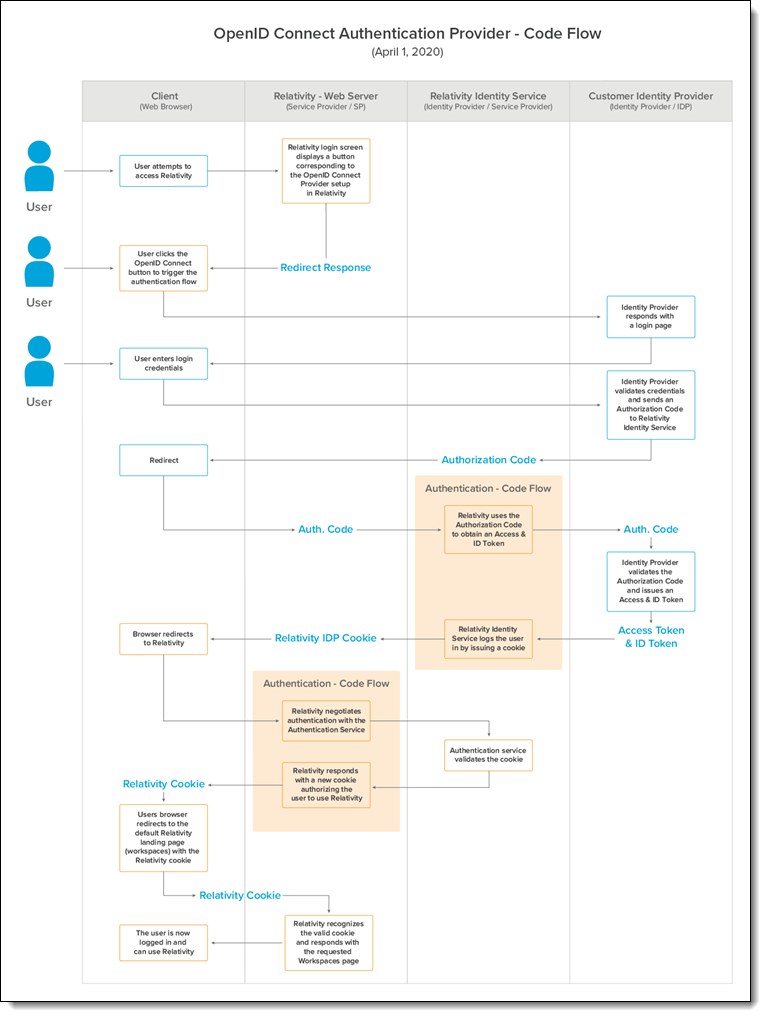
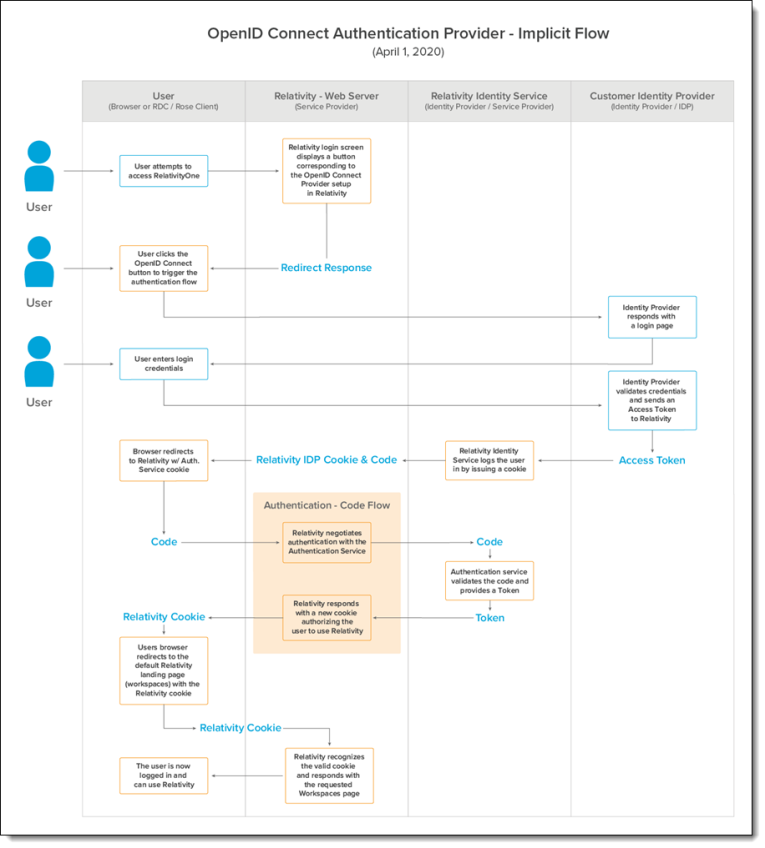
OpenID Connect authentication provider flows
There are two authentication provider flows used with Relativity: code flow and implicit flow. Below are two images showing a detailed OpenID Connect authentication flow for both.
OpenID Connect 1.0 authentication providers are not compatible with Relativity User Load Balancing (RULB).