


Feedback
Office 2024 Upgrade Guide
This guide includes step-by-step instructions for upgrading from Office 2016 to Office 2024. Server 2024 Patch 2 is the minimum version requirement for deploying Office 2024 in your environment. To learn more about using Office 2024 for Relativity Server, including processing and native imaging, see Upgrading your Workers to Office 2024.
Upgrade process overview
Before you get started, here is a brief description of the upgrade sequence.
Office 2024 should be installed in your environment before deploying Server 2024 Patch 2.
- Stop all workers.
- Stop the Invariant Queue Manager service.
- Completely uninstall all Office 2016 applications including Office, Project, and Visio.
- Install Office 2024 Professional Plus, Project 2024 Professional, and Visio 2024 Professional.For Office 2024 prerequisites, uninstall and download instructions, please refer to the official Microsoft documentation. To learn more, visit Microsoft documentation.
- Apply valid license keys for Microsoft Office including Office Professional Plus 2024, Project Professional 2024, and Visio Professional 2024.
- Enable the database toggle Invariant.Toggles.Office2024Toggle and its imaging equivalent.
- Install Server 2024 Patch 2 in Relativity and Invariant.The Invariant installer should be run on the Queue Manager Server and not the worker servers.
Upgrade instructions
To upgrade from Office 2016 to Office 2024, complete the following tasks:
Stop all Workers
- In Relativity, navigate to the Servers tab.
- Select a Worker from the list.
- Click on the Stop Worker button in the Resource Server console.

- Click Stop Worker.
Stop Invariant Queue Manager
- Open the Queue Manager Service and then Windows Services.
- Select the Invariant Queue Manager service.
- Click on the Stop icon in the toolbar to end the service.
Stopping the service prevents jobs from being distributed during the upgrade.
Uninstall Office 2016
If Office 2016 is installed in your environment, ensure that Office 2016, Project 2016, and Visio 2016 are fully uninstalled prior to beginning the Office 2024 installation.
If you are installing Office 2024 and do not have any previous versions of Office installed, proceed directly to the installation steps below.
Install Office 2024, Project 2024, and Visio 2024 32-bit
There are multiple ways to install Office products depending on deployment method or environment. To learn more, including step-by-step instructions, visit Microsoft documentation.
Sample configuration
The following is an example of an installation configuration:
<Configuration>
	<Add OfficeClientEdition="32" Channel="PerpetualVL2024">
		<Product ID="ProPlus2024Volume">
			<Language ID="en-us"/>
		</Product>
		<Product ID="VisioPro2024Volume">
			<Language ID="en-us"/>
		</Product>
		<Product ID="ProjectPro2024Volume">
			<Language ID="en-us"/>
		</Product>
	</Add>
	<Display Level="None" AcceptEULA="TRUE"/>
	<RemoveMSI/>
</Configuration>
Installation considerations
- You must install and activate the 32-bit release of Office 2024 Professional Plus before using it with Relativity.
- You may optionally install and activate Project and Visio 2024 if your organization intends to process these files.
- If upgrading from Office 2016 to Office 2024, use the RemoveMSI option in the configuration.xml to cleanly remove Office 2016.
- You must accept the Microsoft Office license by either:
- Setting the AcceptEULA flag in the configuration.xml file.
- Accepting the license manually after installation in Office, Project, or Visio.
Configure Office 2024 toggles in Relativity
Add the following toggle values to Relativity:
| Toggle name | Table | Default | Purpose |
|---|---|---|---|
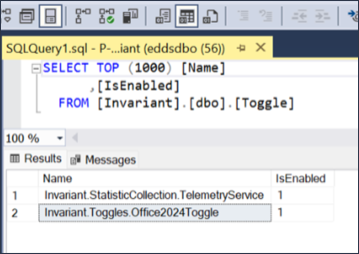
| Invariant.Toggles.Office2024Toggle | Invariant.dbo.Toggle | False | When set to True, processing and imaging enable the system to work with Office 2024. |
| Relativity.Imaging.Toggles.Office2024Toggle | EDDS.eddsdbo.Toggle | False | Imaging equivalent for Relativity. |
Enable Office 2024 toggle in Invariant
To add or enable the toggle, run the following script in the Invariant database:
USE Invariant;
MERGE [Invariant].[dbo].[Toggle] AS T
USING (SELECT 'Invariant.Toggles.Office2024Toggle' AS [Name]) As S
ON (T.[Name] = S.[Name])
WHEN MATCHED THEN UPDATE SET [IsEnabled] = 1WHEN NOT MATCHED THEN
	INSERT ([Name], [IsEnabled]) VALUES (S.[Name], 1);
To verify that the Office 2024 toggle is enabled in Invariant, run the following script. The query should return a row matching the toggle as shown below.
SELECT *
FROM Invariant.dbo.Toggle
WHERE [Name] = 'Invariant.Toggles.Office2024Toggle';
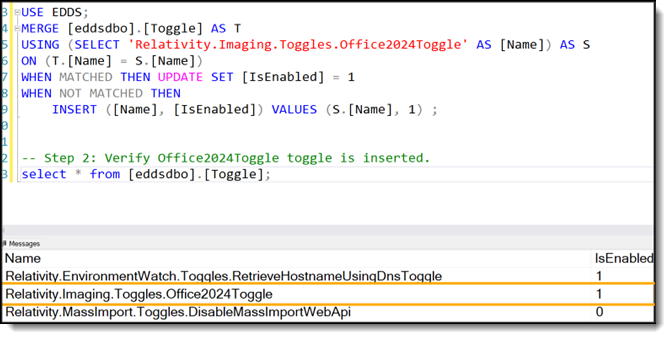
Enable in EDDS
Run the following script to add or enable the toggle in the EDDS database for imaging:
USE EDDS;
MERGE [eddsdbo].[Toggle] AS T
USING (SELECT 'Relativity.Imaging.Toggles.Office2024Toggle' AS [Name]) As S
ON (T.[Name] = S.[Name])
WHEN MATCHED THEN UPDATE SET [IsEnabled] = 1
WHEN NOT MATCHED THEN
	INSERT ([Name], [IsEnabled]) VALUES (S.[Name], 1);
Install Relativity version 24.0.375.2, Patch 2 and Invariant version 24.0.515.11, Patch 2
Install Server 2024 Patch 2 or the latest cumulative update after Patch 2 for Relativity and Invariant. You can find the installation package on Relativity Community. To download the installation package, visit Relativity Community.
The Invariant installer should be run on the Queue Manager Server and not the worker servers.
Invariant Patch 2 is delivered as a full installation, not a lightweight patch executable. The full installation may take up to 30 minutes to complete.
Post-Installation Checklist
Complete the following tasks to ensure that the installation is complete:
- Open Relativity and confirm that the Workers are active and that processing and imaging assignments are selected.
- Confirm that imaging and processing jobs complete successfully.
- Review Windows Event Logs for any new errors or warnings. If any required software or settings are missing, a Warning entry will appear in the Event Viewer. To Review the Windows Event Logs, do the following:
- Open the Event Viewer and navigate to Windows Logs > Application.
- Apply a filter by setting the Source to Invariant and selecting the log levels Critical, Error, and Warning.
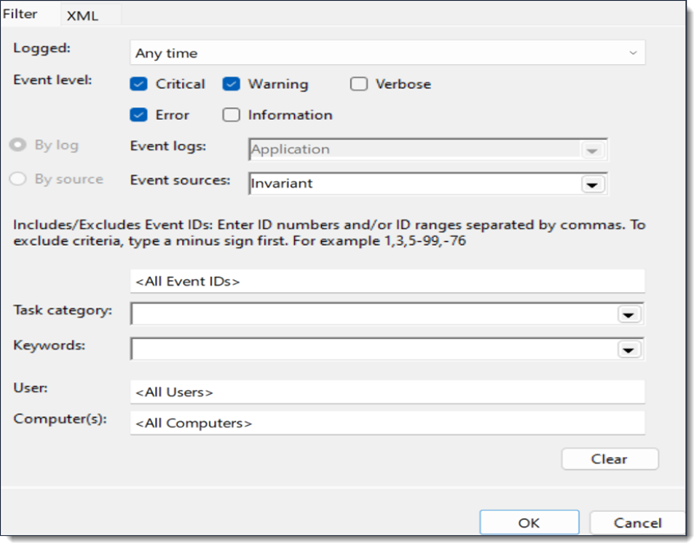
- Click OK.
- Confirm there are no entries that state: "Worker is not available for Processing or Imaging."
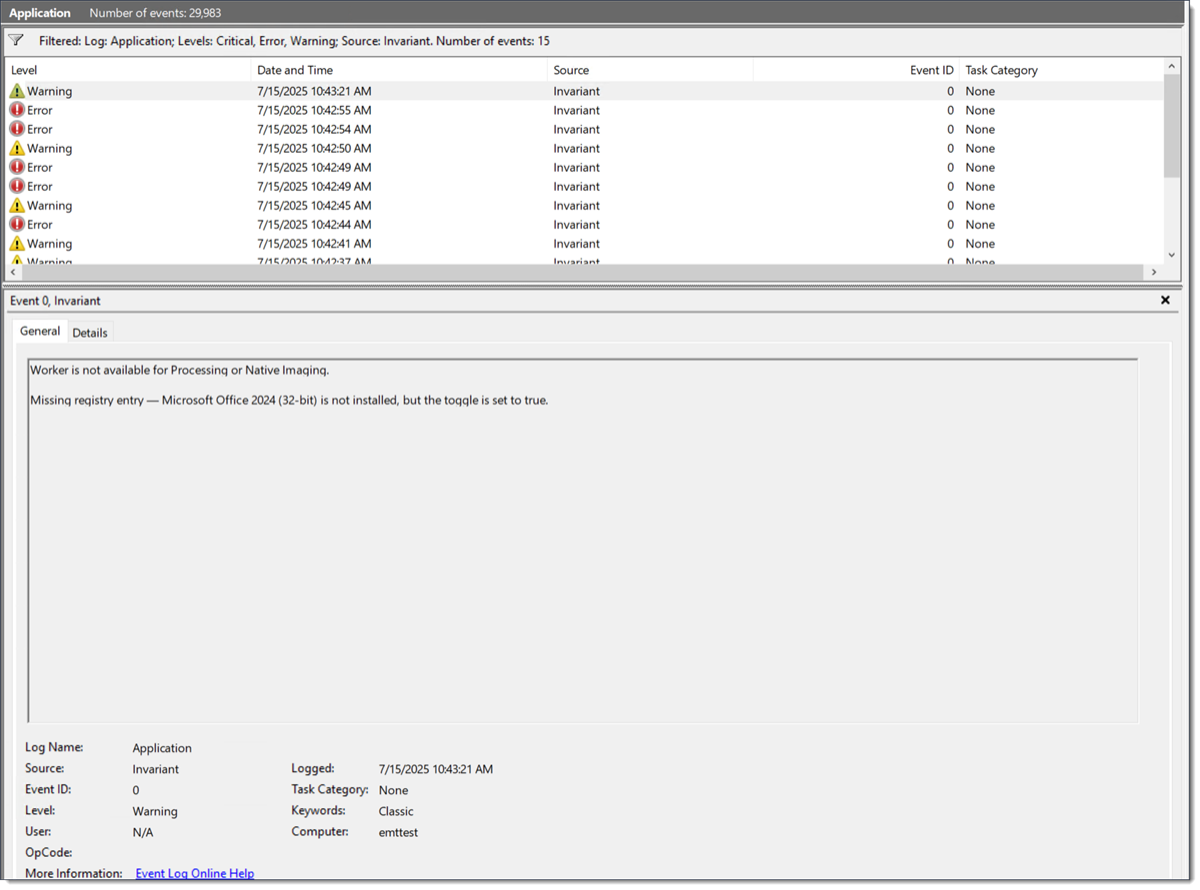
- If this error appears, the message will also specify what is missing on the Worker. Update the Worker accordingly, restart the Worker, and then assign processing and native imaging to the Worker from the Servers tab.
User information
After applying Invariant Patch 2, the application automatically accepts the privacy prompt the first time any Office application is launched under the relserviceaccount, which is the account the worker process uses.
Once acknowledged, the privacy pop-up window should not appear again, even if Office apps are opened manually afterward with the account that the worker process runs.