


Note: Relativity ended support for and access to the Relativity Desktop Client (RDC) for RelativityOne commercial customers on December 31, 2023. Import/Export is being used for all importing and exporting workflows.
For RelativityOne Government customers, beginning March 31, 2024, RDC will only operate in web transfer mode, which will result in significantly slower transfer speeds. It is highly recommended that Government customers begin using Import/Export in RelativityOne as soon as possible to prepare for the deprecation of RDC on June 30, 2024. Starting July 1, 2024, RDC will no longer be operational. See the Community article RDC Deprecation FAQ for additional information.
You can import data into Relativity Dynamic Objects for use in Relativity applications. Dynamic object data imports follow the same general guidelines as document data imports. Before importing data into a dynamic object:
- Create the data file. The file must be properly delimited (for example, a comma-delimited CSV file as shown in the example below) and meet the standards for Relativity data imports.
Media Received ID,Received From,Received On,Type,Letter From,Letter Date,Letter Title
LET1,Laura Crowne,12/23/2013,summons,Tuchman,12/31/2013,Regarding the Simpson Case
LET2,Earle Byrd,11/30/2013,brief,Tuchman,12/31/2013,The Simpsons Matter
LET3,Earle Byrd,10/31/2013,summons,Tuchman,12/31/2013,Regarding the Simpson Case
LET4,Earle Byrd,9/29/2013,brief,Tuchman,12/31/2013,The Simpsons Matter
LET5,Earle Byrd,12/31/2013,summons,Tuchman,12/31/2013,Regarding the Simpson Case
LET6,Laura Crowne,12/23/2013,summons,Tuchman ,12/31/2013,The Simpsons Matter
LET7,James Jones,11/30/2013,brief,Marsch,12/31/2013,The Simpsons Matter
LET8,James Jones,10/31/2013,brief,Tuchman,12/31/2013,The Simpsons Matter
LET9,James Jones,9/29/2013,summons,Tuchman,12/31/2013,The Simpsons Matter
Importing RDC Permissions
The following permissions are required to use the importing feature in Relativity Desktop Client:
| Object Security | Tab Visibility | Admin Operations |
|---|---|---|
|
|
|
Importing data into the Media Received object
The following example illustrates how to import data into the Media Received object associated with the Media Tracker application:
- Open the RDC and select a workspace.
- Select the Media Received object type.
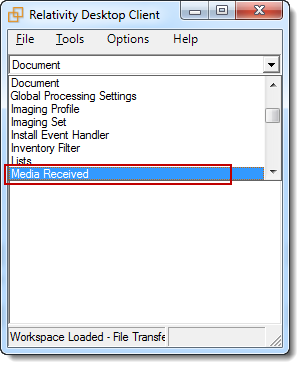
- On the Tools menu, point to Import and click Media Received Load File. The Import Media Received Load File dialog appears.
- On the Load File tab, click
 to browse for a document load file. Next, set the other options as necessary.
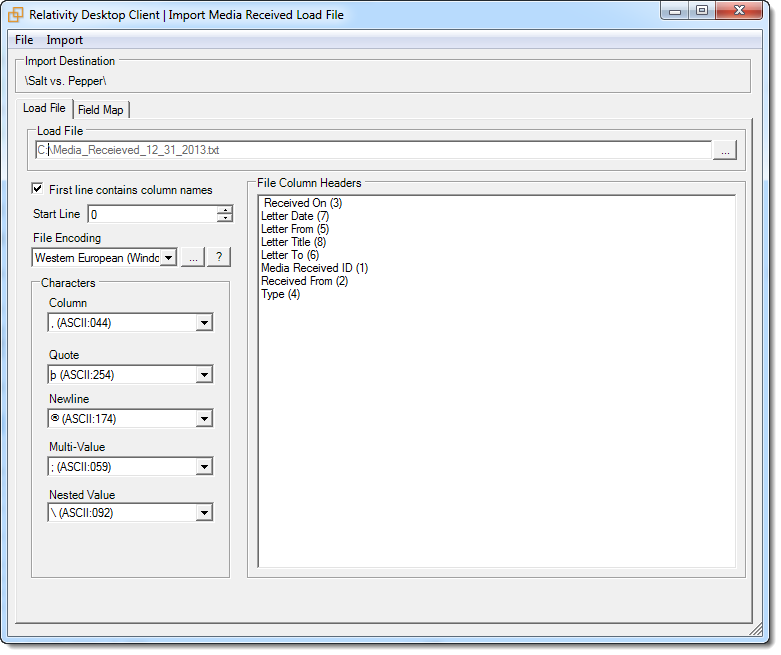
- Click the Field Map tab. To automatically map fields, click Auto Map Fields. The fields from the load file are mapped to any existing fields of the same name in the workspace.
-
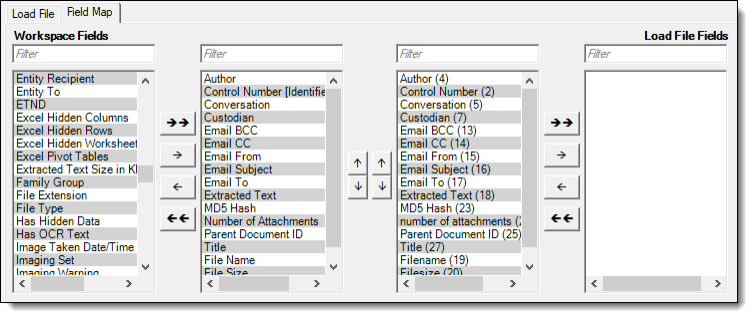
Only fields matched in the center columns are loaded into the workspace. Other fields in the Workspace Fields and Load File Fields lists are ignored. You must always match the identifier field for the load file.
Consider the following when auto-mapping fields:
- Case isn't taken into account for the mapping. For example, a field named "email" in the load file would map to a field named "Email" in the workspace.
- Spacing is taken into account. For example, in a two-word field name, if there is one space between words in the workspace field, and two spaces between words in the load file field, the fields will not be mapped.
- Characters are mapped only to themselves. For example, an underscore is only mapped to another underscore, not to a space.
Note: You can also manually map fields in the load file to existing fields in the workspace.
To manually map fields, highlight a field from the Workspace Fields list and click the right arrow to move the field into the center column. Then, highlight the corresponding field in the Load File Fields list and click the left arrow to move the field into the center column.
You can move all fields in a list into a new column by clicking the double arrow buttons. Use the up and down arrow buttons to reorder the fields. - In the Overwrite section, select one of these options to indicate the type of load:
- Append Only - loads only new records
- Overlay Only - updates existing records only. You must include a workspace identifier in an overlay load. This field acts as a link indicating to Relativity where to import the data.
- Append/Overlay - adds new records and overlays data on existing records
-
- On the Import menu, click Import File.
- After the import completes, open the Media Received tab in Relativity and review the data.
(Click to expand)