


Feedback
You can import image load files that are Opticon-formatted page-level files. Relativity only accepts single page, Group IV TIFs, or JPGs.
Importing RDC Permissions
The following permissions are required to use the importing feature in Relativity Desktop Client:
| Object Security | Tab Visibility | Admin Operations |
|---|---|---|
|
|
|
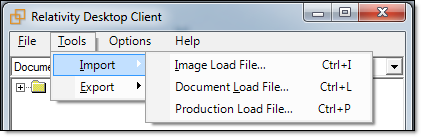
Importing images
To import an image load file:
- Open the RDC and select a workspace.
- On the Tools menu, point to Import and then click Image Load File. (In the RDC browser, you can right-click on a specific folder, point to Import and click Image File.) The Import Production Load File dialog appears.
- (Optional) To use settings in an existing import file, complete these steps:
On the Import Image Load File dialog, click the Import menu, and then select Load Settings.
- Browse for your load settings file (.kwi) in the Open dialog, and then click Open.
Note: The RDC denotes all image and production import settings with a .kwi file extension. However, when you select these file types to filter on when you're choosing to save or load the settings file, the RDC denotes these settings with a .kwx file extension.
- Click OK on the kCura.EDDS.WinForm dialog. Click Open on Choose Load File dialog. Settings from the file are used to populate fields in the Import Image Load File dialog. (You can also modify the settings on this dialog as necessary.)
- Continue with step 5.
- On the Import Image Load File dialog, set the options as necessary. Select the following options:
- Load File - click
 to browse for your page-level load file. Relativity accepts Opticon format image load files.
 - Start Line - select the line number in the load file where you want the import process to begin. The default value is 0, which results in loading the entire file.
- Numbering - select one of the following options:
- Use load file page IDs - default setting.
- Auto-number pages - select this option if page IDs in the production are not unique. For example, you might import a set of TIFFs that share a page identifier for each record. The page identifiers are shared per document and are not unique. The Auto-number pages option appends the 01, .02, and so on to the page-level identifier, creating a unique number per page.

Note: Enable Auto-number pages if you are importing productions that use document level numbering without page numbers, and include documents that contain multiple pages.
- Select Mode - select one of the following options:
- Append Only - load only new records.
- Overlay Only - update existing records only. You must include a workspace identifier in an overlay load. This field acts as a link indicating to Relativity where to import the data.
- Append/Overlay - adds new records and overlays data on existing records.
Note: Select Append to import the extracted text and natives from a .dat file. Select overlay when overlaying production images onto the existing documents.
- (Available Only for Production Load Files) Production - select a Relativity production that you want to upload images to. Only new production sets without a production source appear in this list.
- (Available Only for Production Load Files) Overlay Identifier - select a field that stores overlaid document-level Bates information on the document.
Note: The fields in the drop-down menu are fixed-length fields with a manually-applied SQL index. Note that this is NOT the same as adding the field to the full-text index. Contact your SQL database administrator to apply an index to a field.
- Repository - if the native files reside in a Relativity-accessible location, click Repository, and select one of the following options. (You can ignore this option if your files are on your desktop or laptop, or if you are a consulting partner loading data into our hosting environment.)
- Copy files from current location to selected document repository - select this option to copy files from the location in the selected load file field to the selected document repository.
Note: You can use the Default option to configure an environment level.

- Do not copy files to a Relativity document repository - select this option if the native files have already been copied to their final location, which is accessible by Relativity.
Note: Selecting this option causes the transfer mode to display as disabled.
- Copy files from current location to selected document repository - select this option to copy files from the location in the selected load file field to the selected document repository.
- (Available Only for Image Load Files) Load Extracted Text - select this option to load new text for Production documents that may be revised based on redactions. The text files must be meet these requirements:
- Have .txt extensions
- Stored in the same directory as TIFF files,
- Named in the same way as the TIFF files
- (Available Only for Image Load Files) Encoding for undetectable files - select an encoding for the text file. Click for additional language options or click
 for additional information about encoding.
- Western European (Windows) - indicates the Windows standard encoding for English.
- Unicode - utilizes more than 107,000 characters covering 90 scripts.
- Unicode (Big-Endian) - is the same as Unicode, except that the byte order is reversed.
- Unicode (UTF-7) - represents Unicode text using a stream of ASCII characters to guarantee that the high bit will always be zero.
- Unicode (UTF-8) - represents all characters in the Unicode character set using 8-bit bytes.
- Load File - click
-
- Click Import File on the Import menu.
- Review the progress of the import.
You can view the progress of an import through the RDC. Select the following tabs to display specific information:
- Summary - displays general information about the number of records, processing warnings, and errors. The following screen shot displays file progress for an import job.
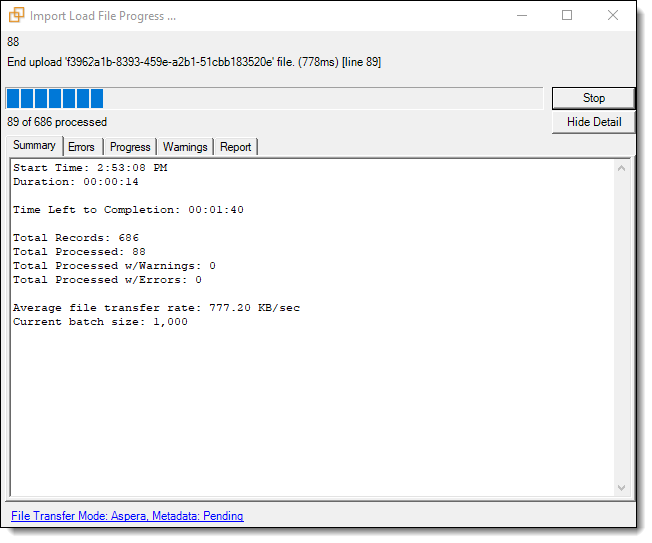
- Errors - lists any errors encountered during the load. The Errors tab displays any errors that occur when you import content with the RDC.
Note: When you run an import job, the RDC only imports records with no errors into the workspace.
- Progress - displays a detailed view of the load progress.
- Warnings - displays information about loading or connection issues.
- Report - includes the following files that you can export:
- Export Error Report - exports a .csv file with a summary of errors.
- Export Error File - exports a .dat file, which is a document-level load file containing only records with errors.
- File Transfer Mode - displays the following information:
- Web mode - this mode uses the web server and it is the standard.
- Direct mode - this mode provides faster performance, but requires a connection to the network hosting the data, as well as specific Windows group permissions.
- Summary - displays general information about the number of records, processing warnings, and errors. The following screen shot displays file progress for an import job.
- (Optional) To save your import settings, point to the File menu, and then click Save Import Settings. Choose a location for the production load file (.kwi). See Saving import settings.